Golf is meant to be simple and my swing philosophy focuses on momentum and using it as efficiently as possible. This philosophy is applied to all parts of golf including chipping and putting. For the full swing, using momentum properly can achieve the most amount of speed and consistency with the least amount of strain on the body. For putting and finesse shots, using momentum properly allows each golfer to develop the proper feeling in the hands that allows for superior distance control and accuracy. Learning how to play golf is more than just learning a golf swing, it is about truly understanding cause and effect and adapting that understanding to different scenarios on the golf course. After the foundation of the swing is established, the goal then turns to refinement and creating shots best suited for different situations on the course. The goal is not only for each student to improve, but to learn the tools necessary to continue to learn and adapt as their game evolves and course conditions change.

Mike was born and raised in Culbertson, Montana, where he started playing golf along with many other sports before the age of 5. Since the age of 12, Mike has played golf competitively and his junior golf career was highlighted with 3 individual high school state championships as well as his win at the Montana State Junior tournament in 2003. He has since gone on to graduate from the University of Idaho in 2009 and gained his class A PGA membership the same year. During his time at the University of Idaho, Mike completed 16 months of internships where he was fortunate to learn from some of the best teaching professionals in the country. Since 2009, Mike has gained some valuable teaching experience through his role as Director of Instruction at Continental Country Club, Junior Golf Leader at Forest Highlands Golf Club, Varsity Golf Coach for Flagstaff High School, Volunteer Assistant Coach for NAU, and as a Teaching Professional at Oakcreek Country Club and Western Skies Golf Club. Although Mike’s passion is in teaching and coaching, he still plays competitively. In 2012 Mike played in the PGA Championship at the Ocean Course at Kiawah Island. In 2012 and 2013 he played in the PGA Professional National Championship, and in 2014 he played in the PGA National Assistants’ Championship. Mike is a constant student of the game and you will often see him working on his own game when he isn’t helping his students.
- 8/26: Mike's Golf 101: Lesson 3 - Part 5: Length of Stroke - Updated(10.14.20)
- 7/22: Mike's Golf 101: Lesson 3 - Part 4: Center Contact - Updated(10.14.20)
- 6/13: Mike's Golf 101: Lesson 3 - Part 3: Eye Position - Updated(6.13.20)
- 6/7: Mike's Golf 101: Lesson 3 - Part 2: Putting Aim - Updated(6.7.20)
- 5/30: Mike's Golf 101: Lesson 3 - Part 1: Putting Grip - Updated(5.30.20)
- 5/24: Mike's Golf 101: Lesson 2 - Part 5: Pre-Shot Routine - Updated(5.24.20)
- 5/16: Mike's Golf 101: Lesson 2 - Part 4: Ball Position - Updated(5.17.20)
- 5/9: Mike's Golf 101: Lesson 2 - Part 3: Aim & Alignment - Updated(5.9.20)
- 5/3: Mike's Golf 101: Lesson 2 - Part 2: Posture & Balance - Updated(5.3.20)
- 4/25: Mike's Golf 101: Lesson 2 Part 1 - Proper Grip - Updated(4.25.20)
- 4/18: Mikes Golf 101 - Chapter 1 - Stop trying to keep your head down! - Updated(4.18.20)
Mike's Golf 101: Lesson 3 - Part 5: Length of Stroke
Part 5 - Length of Stroke
As I mentioned in the last lesson, making center contact is extremely important because it gives you a clearer feel for how far the ball will roll when you swing the putter at a given speed. The length of stroke that you use has a huge influence on when your putter reaches its max speed and is also extremely important for distance control. It is not uncommon to hear announcers on TV or even your every day golfer make some sort of comment related to the dreaded "decel". Deceleration would refer to your putterhead reaching its max speed well before the ball and slowing down before making contact which is especially detrimental to short putts. This is certainly not ideal but neither is over-accelerating the putter after contact. Ideally the putter will reach its maximum velocity very close to when the ball is struck and naturally slow down after. The length of your backstroke significantly influences when your putter reaches its maximum speed and the way in which you accelerate the putter is generally very evident by the length of your follow through.
In both the example of a stroke that decelerates, and the example of a stroke that over-accelerates after contact, you would see one side of the stroke is much larger than the other. The decelerated stroke would generally come from a backswing that is too long for the length of putt and the follow through would be very short. The over accelerated stroke would almost always come from a backswing that is too short and the follow through is very long leading to the putter reaching its maximum speed long after the ball is already struck. When the putter accelerates after the ball is gone, the feeling is difficult to manage because the level of effort doesn't match the outcome for how far the ball rolls. For golfers who struggle with either issue, it is very common that the golfer basically has one size backswing for all lengths of putts and attempts to control distance with how much they accelerate or decelerate their stroke. Ideally, the golfer would change the length of backswing depending on how far they would like to roll the ball and the tempo of their stroke would stay constant.
As with any part of the golf game, there are plenty of examples of great players who have different characteristics to their putting stroke. Brandt Snedeker has consistently been one of the best putters on the PGA Tour for more than the last decade and he has a longer backstroke than follow through. He uses what is referred to as a pop stroke which is a very compact stroke on both the backswing and follow through. Something to keep in mind, unlike many amateur golfers whose backswing is longer than their follow through, his putter reaches its maximum velocity at the ball and slows down after contact. His stroke is very compact but it does change based on the length of putt and the backstroke is only slightly longer than the follow through. Ben Crenshaw is one of the best putters of all time and he also had a backswing that was longer than his follow through. He has a longer backswing and a very steady acceleration into the ball but just like Brandt Snedeker, the putter slows down after contact and the length of stroke changes depending on the length of putt. You wouldn't have to look very far on the PGA Tour to find an example of a symmetrical stroke. There are also plenty of golfers whose follow through is slightly longer than their backstroke. In all of these cases, you would find that the backswing changes in length depending on the length of putt, the putter reaches its maximum speed very close to where the ball is, and the rhythm and tempo is very consistent for all putts.
My preference, and the easiest way to develop proper feel would be to strive to have a stroke that is the same size in the backswing as the follow through. Along with a symmetrical stroke, the goal would be to adjust distance by changing the overall size of the stroke. A short putt would have a relatively short backswing and follow through while a 30 foot putt would have a relatively long backswing and follow through. As I alluded to earlier, many golfers who struggle with putting in general and especially with distance control will attempt to make the same size backswing for both the 3 foot putt and the 30 foot putt. This leads to inconsistencies with the clubface direction, poor rhythm and tempo, and makes distance control very difficult.
Below are three drills to work on the length of your stroke. .
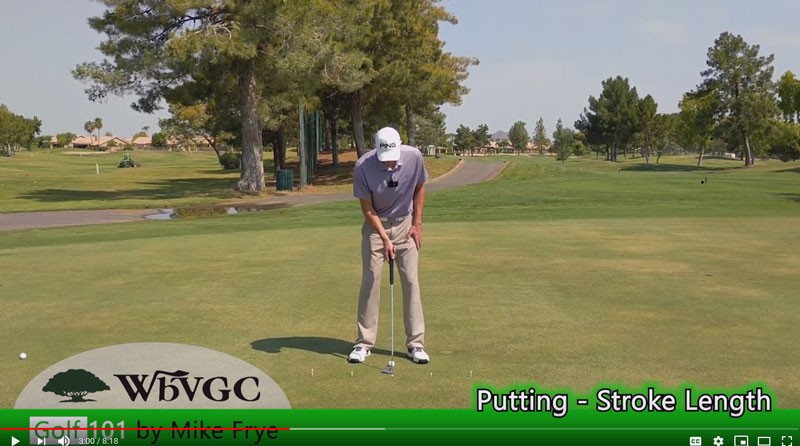
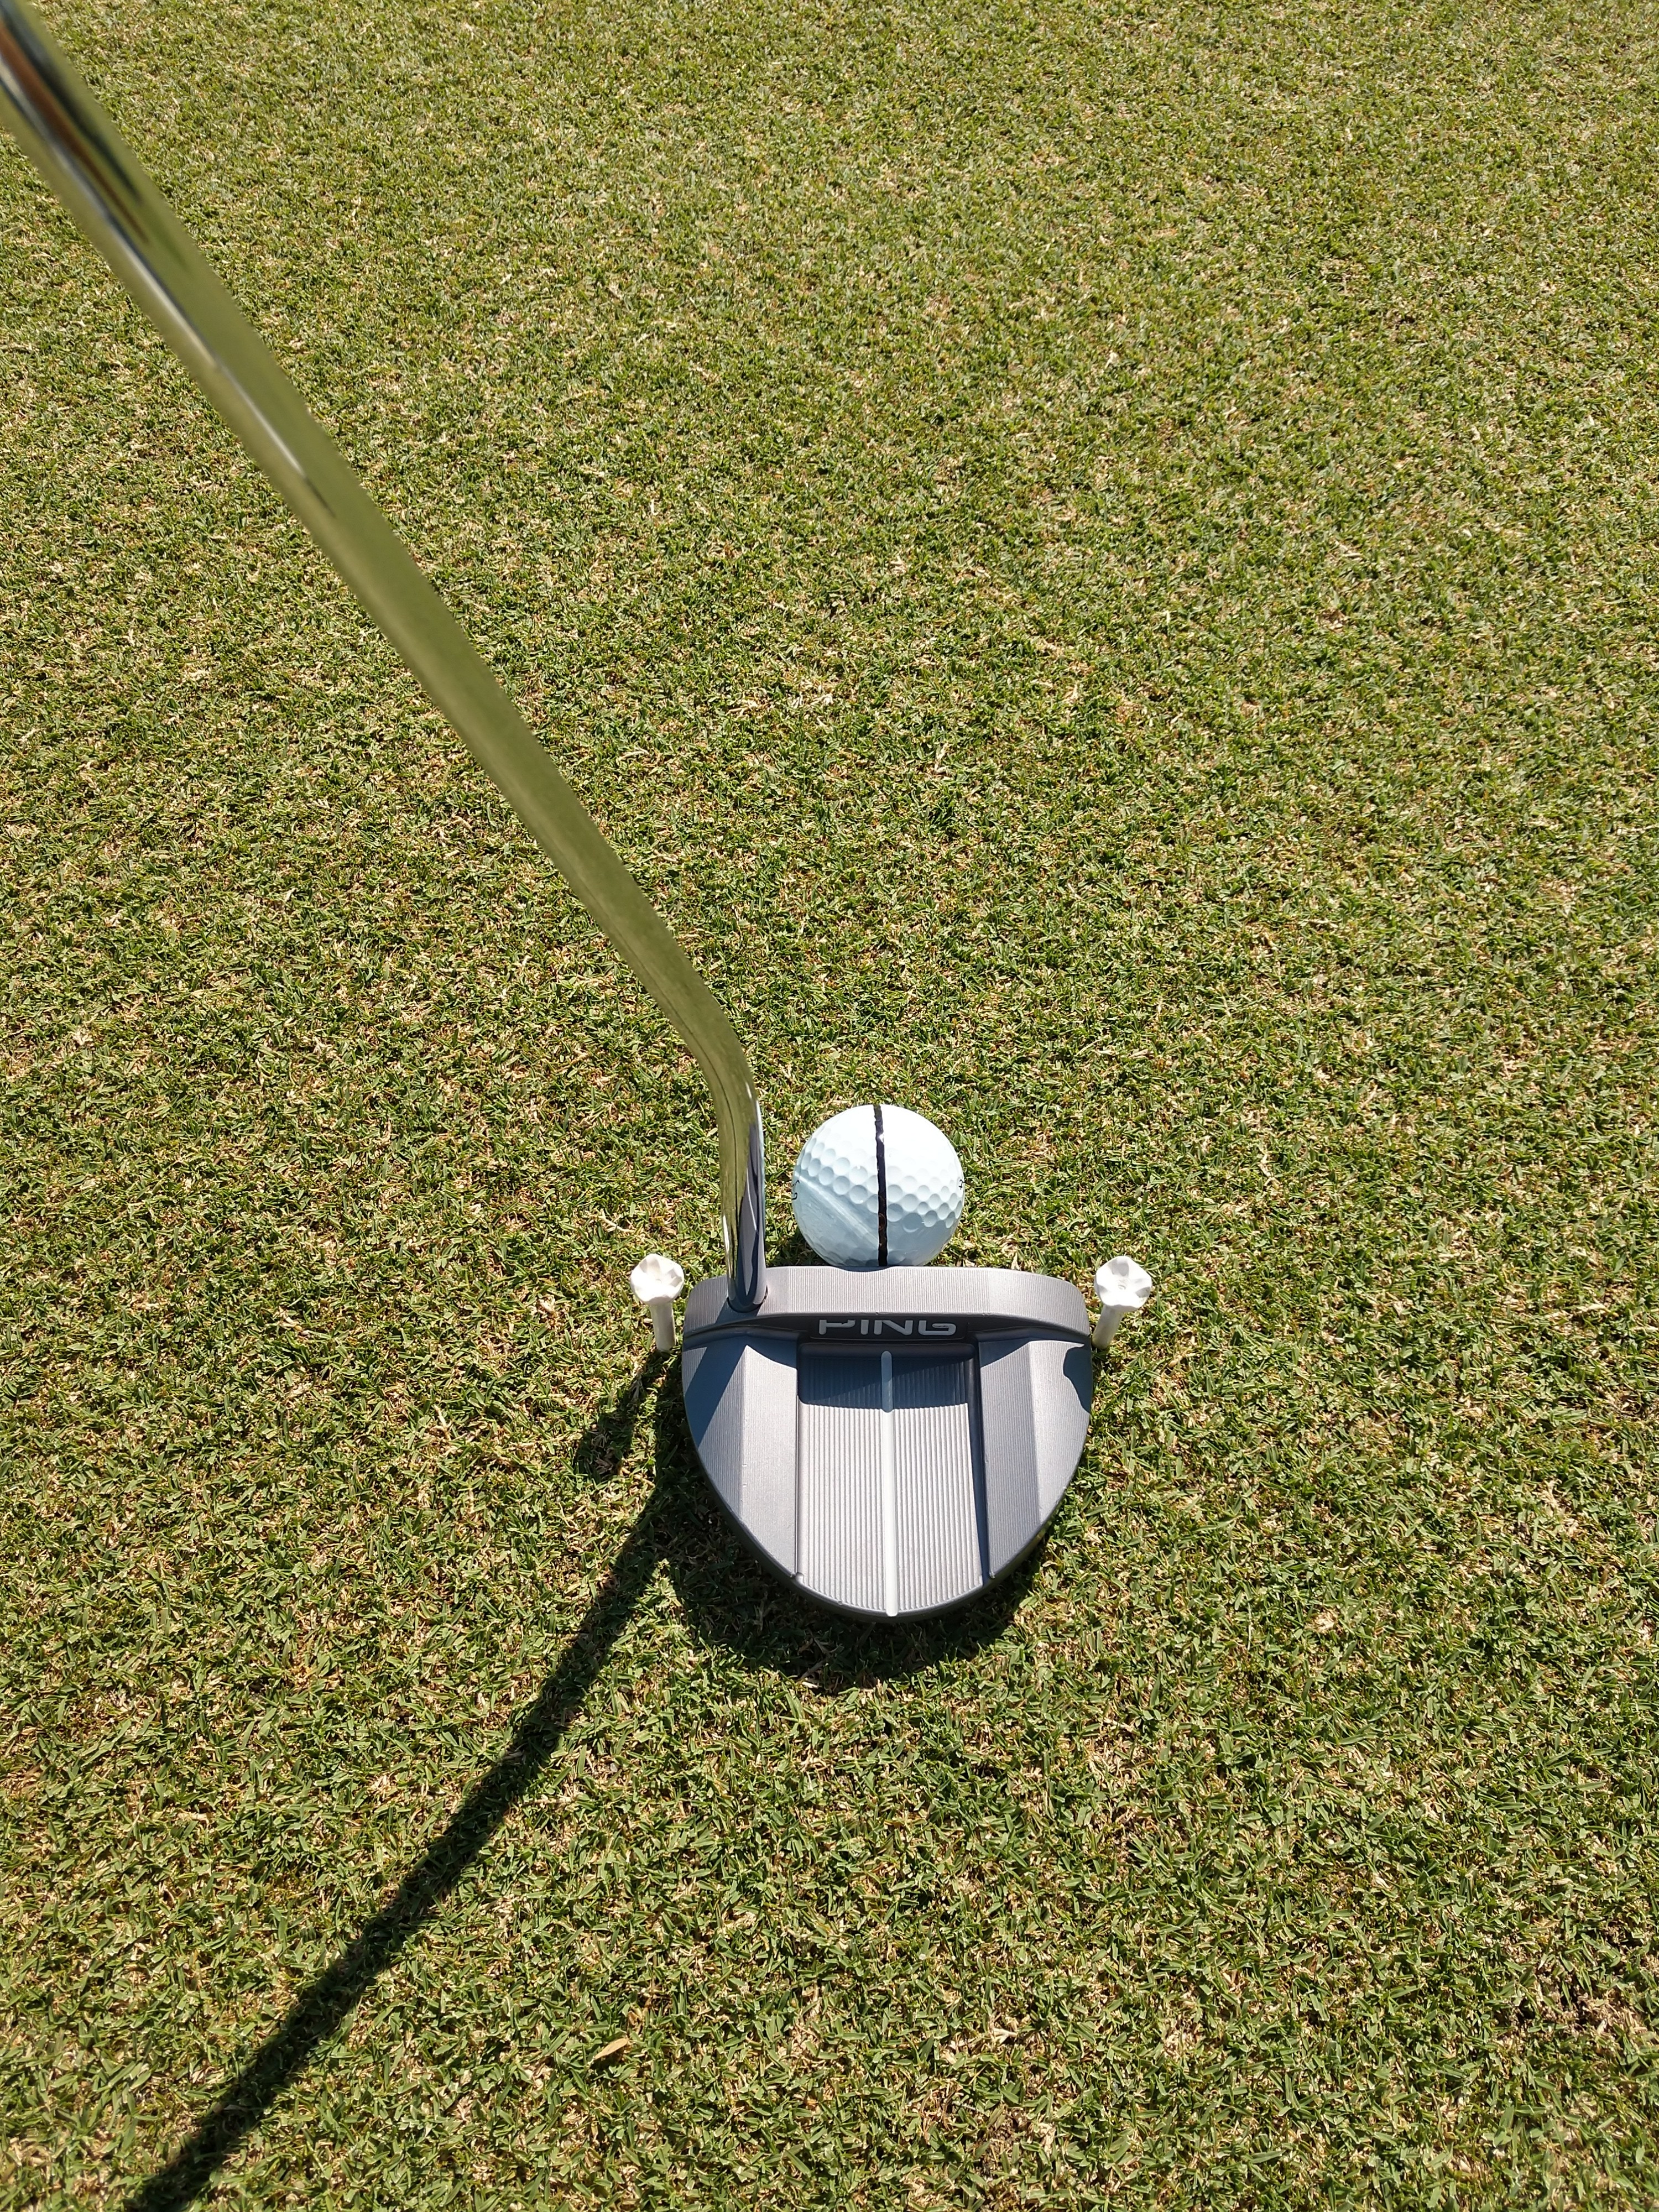
Tee Drill for Stroke Length
This is a very basic drill. First, setup a tee that will indicate the center of your stroke and where the ball will go. Next, use your putter grip as your measurement, add two tees to both sides of the center tee. Make multiple strokes without a ball and try to make your stroke symmetrical on both sides of the center tee. Once you are comfortable with this type of stroke, introduce a ball and continue to try to make a symmetrical stroke with the tees as your reference.
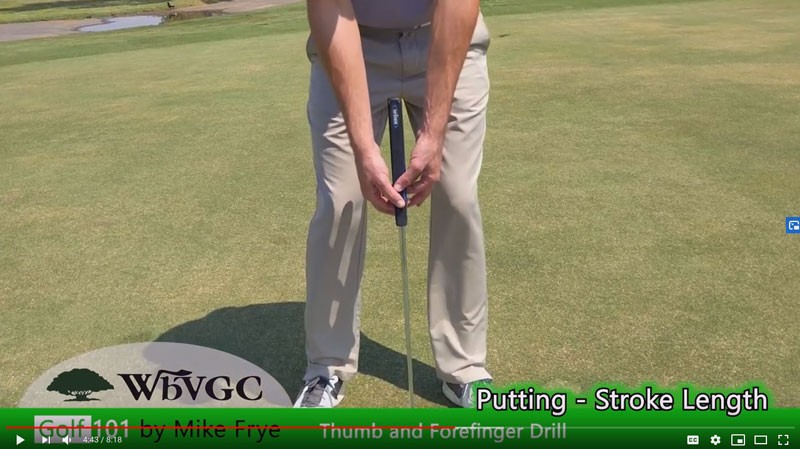
Thumb and Forefinger Drill
The goal of this drill is to basically remove all grip pressure and remove everything in your grip except for your forefingers and thumbs. Make putting strokes back and forth trying to stabilize the grip in between your forearms. This drill requires a pretty slow tempo and also forces your shoulders and arms to move properly in order to stabilize the grip. See the video below for further explanation.
Chopsticks Drill
For this drill, you will need two alignment sticks and a rubberband. The goal of this drill is to take the putter out of the equation to develop a better feel for how your body should move. See the video below for how to get setup to do this drill.

Mike's Golf 101: Lesson 3 - Part 4: Center Contact

Part 4 - Center Contact
Hitting your putts in the same place on your putterface every time is likely one of the most important skills you can develop. Ideally, that spot would be in the sweet spot of your putter. Anytime you strike the ball with anything other than the sweet spot of your putter, it becomes extremely difficult to get your putts started on line and just as difficult to consistently get the correct speed.
Generally, if you hit a ball with the heel it will go left, and if you toe a putt it will go right. This is assuming you present a square clubface at contact. I personally find that I am more likely to toe a putt with a closed clubface, or heel a putt with an open clubface which would result in a different outcome but either way the ball isn't starting on the desired line.
In addition to the incorrect line, you also lose energy into the ball which leads to inconsistencies with distance. The amount of energy lost into the ball is dependent on the type of putter you are using but even the most forgiving putters work significantly better when the ball hits the sweet spot. With putting, the only thing we can really feel in regards to distance is the amount of speed we swing the putterhead. With off center hits, you get a misleading outcome where the ball will come up short and often leads to swinging your putter faster than necessary on the next putt. If you then hit the sweet spot on the next putt, you may see the ball go rolling way past the hole and setting up the dreaded three putt. This cycle often repeats itself over and over throughout the round which is why center contact is vital to developing distance control.
Below are 2 drills to help you work on these skills as well as increase your awareness for center contact.
Gate Drill
Setup tees so that your putter can barely pass through them and make your normal stroke. If you hit the inside tee you would have toed the putt, if you hit the outside tee you would have heeled the putt.
As with any drill, you can make the tees a width that matches your skill level. If you are a more advanced golfer, make the tees just barely wide enough for the putter to pass through. If you aren't as advanced, give yourself a little extra room and work towards bringing the tees in closer to the width of your putter with practice.

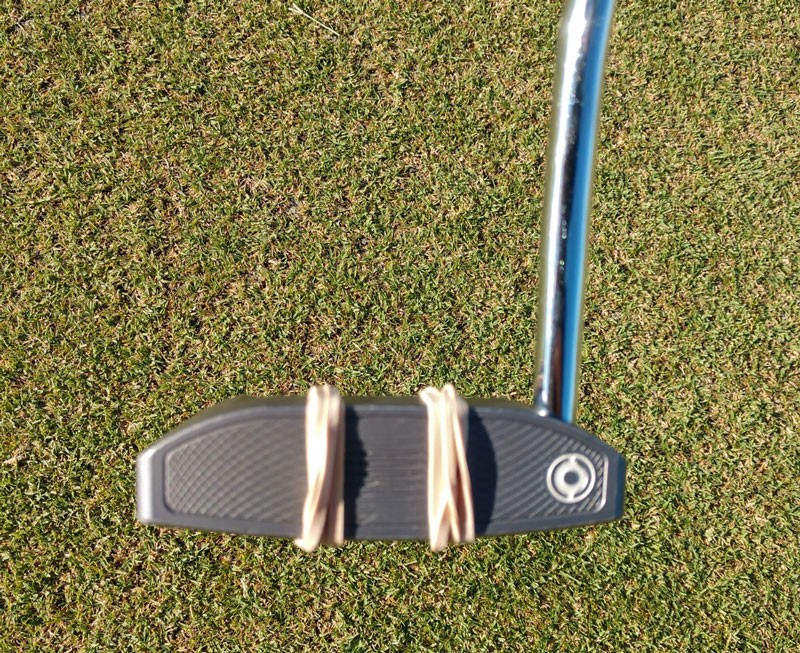
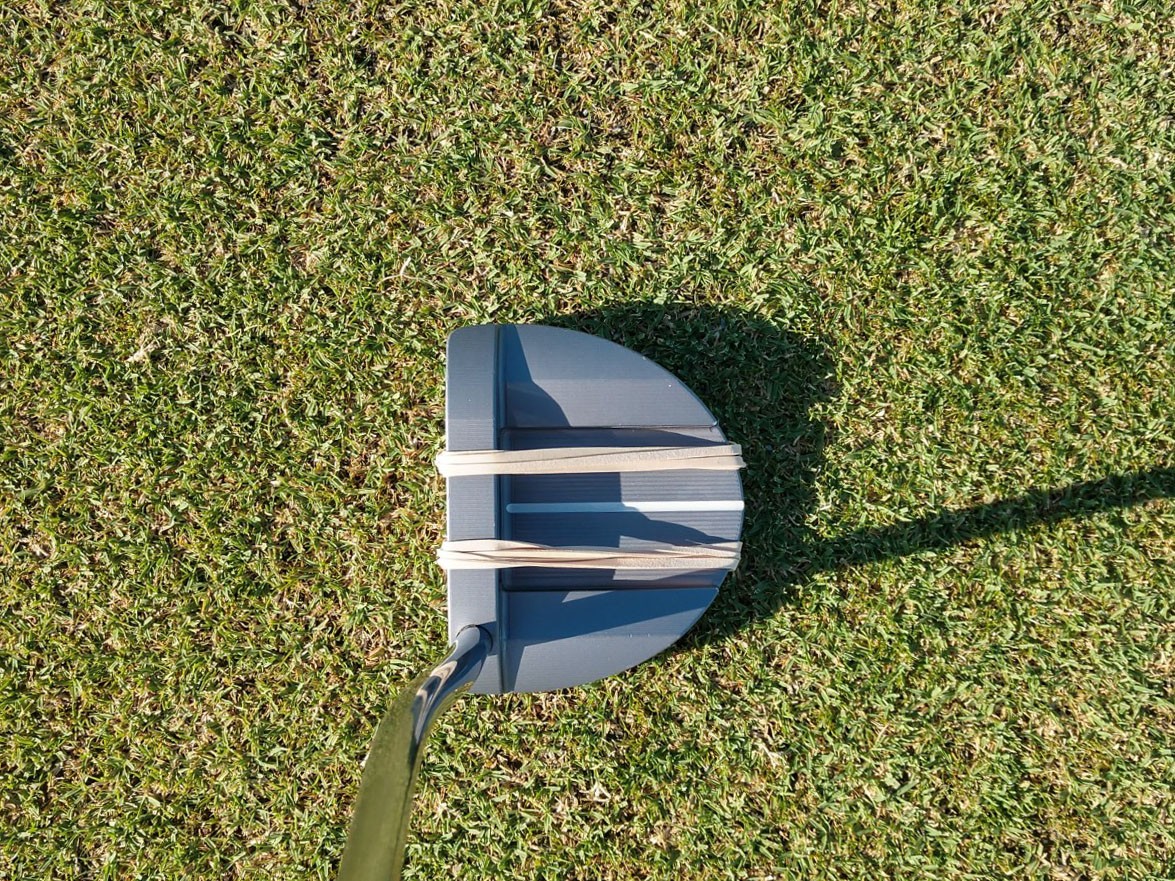
Rubber Band Drill
Put the rubber bands around your putterhead in a way that only exposes the sweet spot of your putter. This should be where the center line is drawn on your putter. With this drill, it is easy to tell when you make an off center strike because the rubber bands will give a different feel and the ball will jump off line unless you hit the sweet spot.
With this drill you can just putt like you normally do, but the rubber bands will give you more awareness of what you are trying to accomplish. As with the gate drill above, you want to challenge your ability level but also don't go too hard on yourself. If you are an advanced golfer, put the rubber bands closer together making sure that there is enough of the putterface exposed to hit the ball with a good stroke. If you aren't as advanced, spread them out a little more and work towards bringing the rubber bands closer with practice.
Mike's Golf 101: Lesson 3 - Part 3: Eye Position

Part 3 - Eye Position
In my opinion, the overall goal of correct eye position is to allow you to accurately see where you are aiming when you are standing over the ball. The first step of this process is to aim your ball and putterhead correctly. The next step is to find the eye position over the ball that allows you to see your line correctly. In theory, this should be when your eyes are directly over the ball but in reality I don't always see that to be true with many golfers.
An eye position directly over the golf ball when putting was a staple of teaching for many years. There are also quite a few of the best putters in the world who do have their eyes directly over the ball when they putt. This eye position can and will be the correct position for some golfers. However, it is more likely that having your eyes slightly inside of the ball will be the best place for you. It all comes down to the eye position that allows you to see a straight line correctly.
If you have ever used a line on your ball and got up to hit your putt, you may have noticed that when you address the ball the line looks incorrect. This gets very confusing if you stand behind your ball and determine that the line is in fact aimed correctly. The reason behind this discrepancy is very much related to your perspective based on your eye position over the ball. If your eyes don't trust your setup aim, you will have a very tough time making a confident stroke. More than likely, you will make a compensation for your perceived aim leading to missed putts. Aiming correctly plus seeing it correctly at address gives you the best chance to start your ball on the intended line and to make a confident stroke.
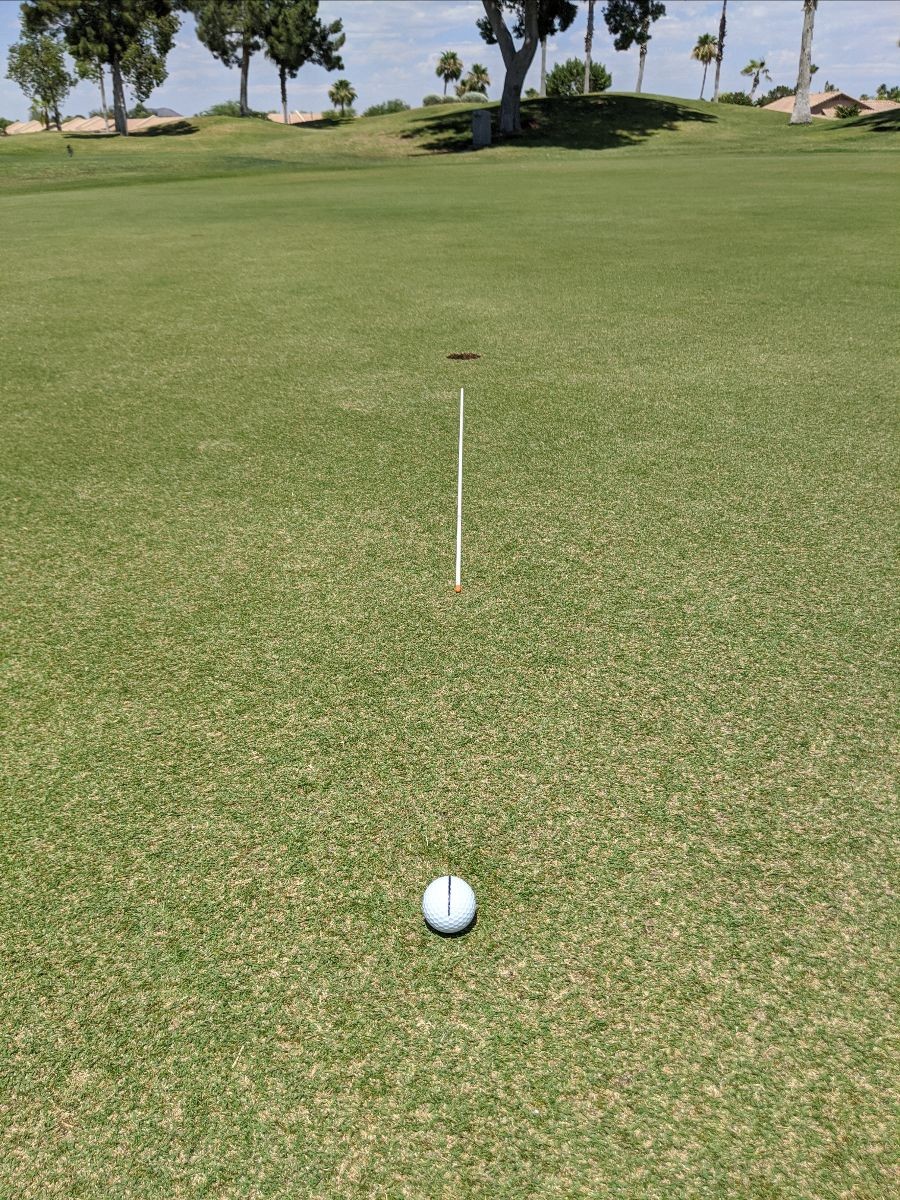
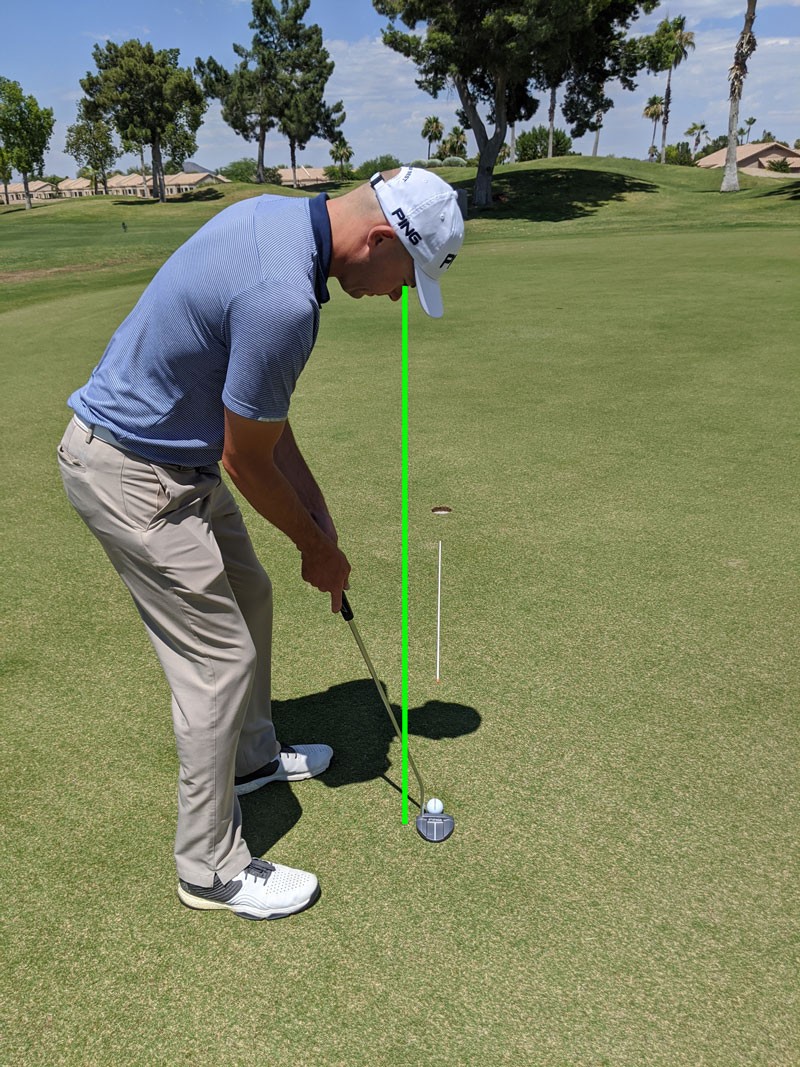
In this week's video, I discuss one of the ways to test your eye position. First, find a straight putt about 10-12 feet away from the hole. Next, aim the line on your golf ball directly at the center of the hole. Third, if you have an alignment stick, place that directly on your putting line about 3-4 feet in front of your ball and double check that it is lined up perfectly with your golf ball and hole. The ball, alignment stick, and hole should all be on one line. If you don't have an alignment stick, you can use a dime or any other small coin in place of the alignment stick. The last step of this process is to address your ball and find the eye position that allows you to see your putter, ball line, alignment stick and hole all lined up correctly. You should notice that if you get your eyes over the ball too far, the alignment stick will look like it is too far to the left. If you are too far from the ball, the alignment stick should look to be to far to the right. Once you find the eye position that works best for you, build your setup maintaining that eye position and roll your putt. Your putt should roll directly into the alignment stick or coin.
Here is an example of the drill to check your eye position. It is very important to take your time when setting this up. As I mentioned in the video, you can close one eye and use the side of your putter shaft to double check the alignment stick and ball line.
Below is an example of me finding my best eye position based on the drill. When you address the ball, try getting closer and further away to see what looks best to you. You should find a distance from the ball that looks best to your eyes. As you can see, my eye position is slightly inside of the ball.
Give this a try and you will be on your way to better golf!
Mike's Golf 101: Lesson 3 - Part 2: Putting Aim

Part 2 - Aim
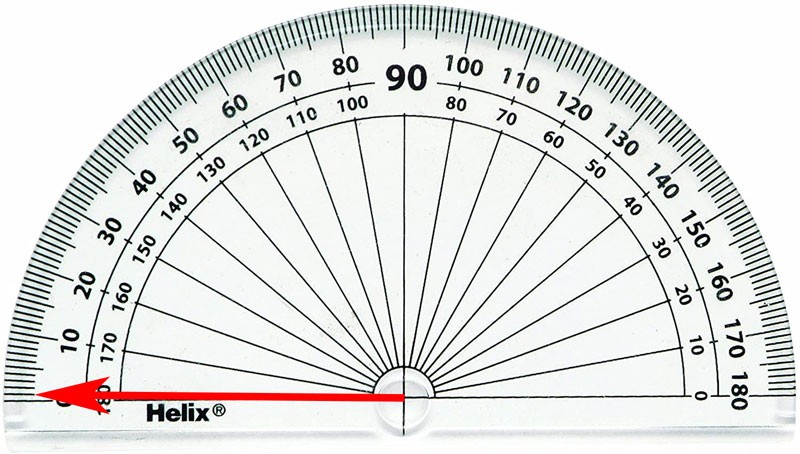
Developing proper aim can take some time and attention to detail. As you can see with the protractor above it doesn't take much to be off by a degree or more. Also, keep in mind that hitting the ball off center on either the heel or toe will result in a ball that starts off line. The most important time for the putter to be pointing in the correct direction is when you make contact with the ball but the best way to develop that skill is to get it right in your setup. This seems like a simple task, but I rarely see amateur golfers consistently aim the putter correctly. It is very important to get the setup aim correct to develop a repeatable stroke. If your setup aim is wrong, it creates a situation where every good stroke you make results in a missed putt. The only way you would make the putt would be to have a compensation in your stroke to match the poor aim. This leads to a false feedback loop leading to putting inconsistencies. Rather than trying to compensate for poor aim, it is much easier to get the aim correct first in your setup and develop a stroke that doesn't require unnecessary compensations.
A great way to get used to lining up correctly is to get a ball where the logo on the side can serve as a line, or to draw a line on the ball using an alignment tool (We will have these available to purchase in the golf shop in the next couple weeks). This is where the attention to detail I mentioned earlier comes into play. Get behind your ball and line up the logo or line with your desired target. As I mentioned before, this line doesn't have to be off my much for you to miss your target. After lining it up, stand behind the ball to double check that you aimed it correctly and adjust as needed. Now address the ball making sure that the line on the ball and the line on your putter are a continuous line. This will give you the best chance of getting aimed correctly.
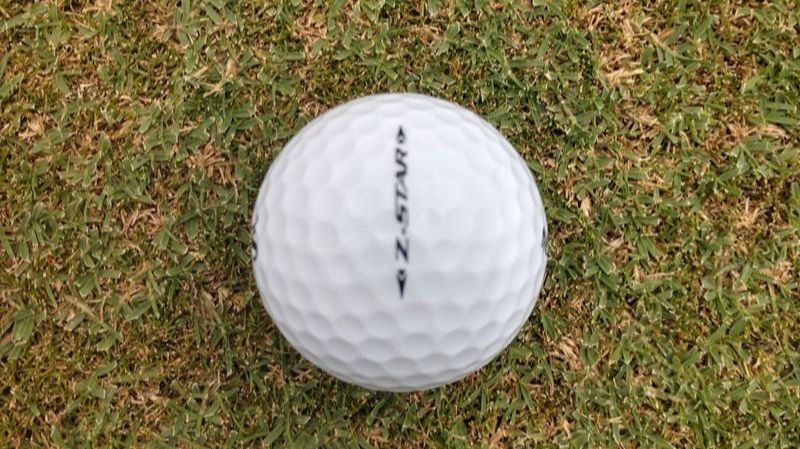
Most golf balls have a logo on the side that is designed to be used as a putter line. Above is an example of a Srixon Z-Star but most golf balls will have something similar to this logo.

If your ball doesn't have a line or you want to be able to see it easier you can use a marker and a line drawing tool like I have in this picture. We will have these tools available in the golf shop in the next couple weeks.
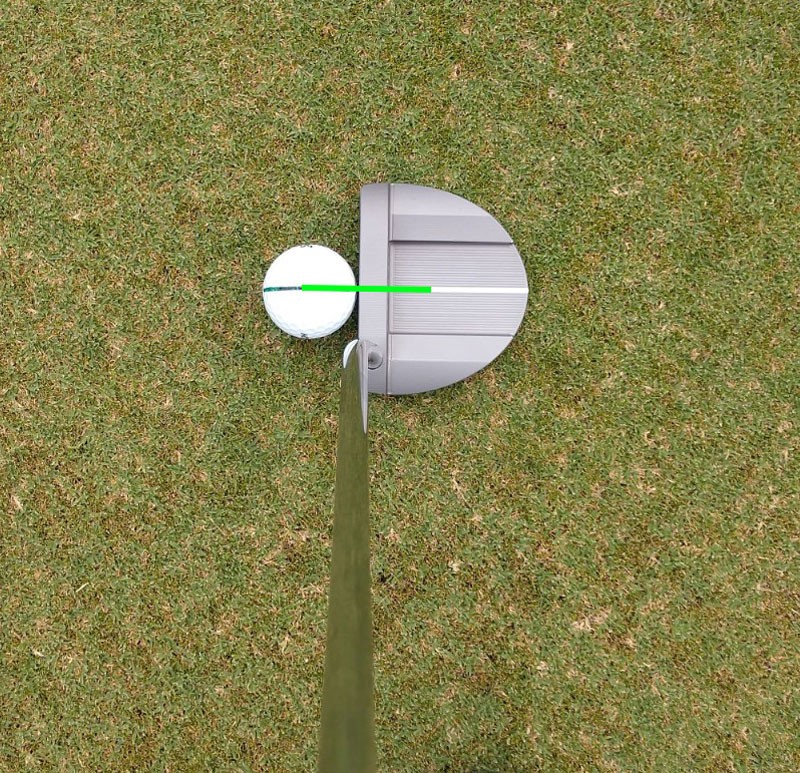
Whether you use the marker line or the logo line, your goal is to line up the center of your putter to the line on the ball.
Once you have spent time on the practice green developing this technique you can definitely use it on the golf course. Many of the best putters in the world use the line on their ball on the golf course. Whether or not you take this technique to the course, I would at least encourage everyone to spend time on the practice green getting aimed correctly and developing a successful stroke.
Give this a try and you will be on your way to better golf!
Mike's Golf 101: Lesson 3 - Part 1: Putting Grip

Part 1 - Grip
Over the years you could find a plethora of different techniques that have worked for different golfers. With that being said, there are some consistencies among some of the best putters and that is what I consider to be a great place to start.
The first basic fundamental is the grip you use for your putter. The putting grip should not be exactly the same as the grip you use for a full swing. With putting, we want to do everything we can for feel and accuracy whereas in a full swing there is a much higher premium on creating clubhead speed for distance. We don't generally need to hit a putt much over 60-70 feet so the premium is on feel and accuracy.
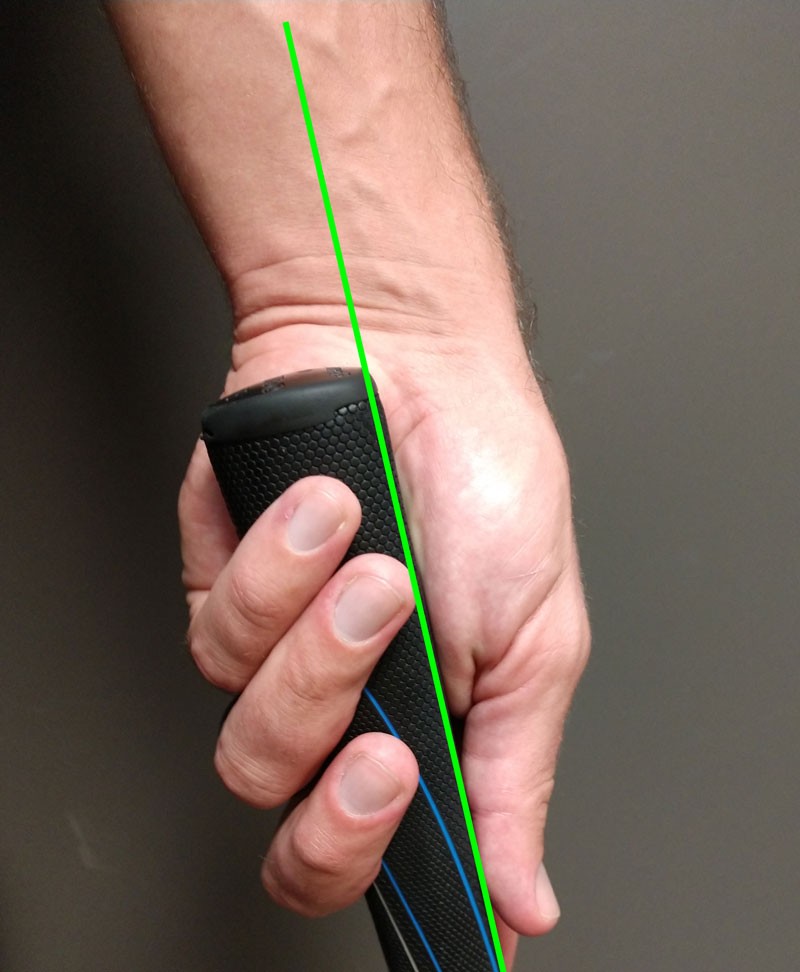
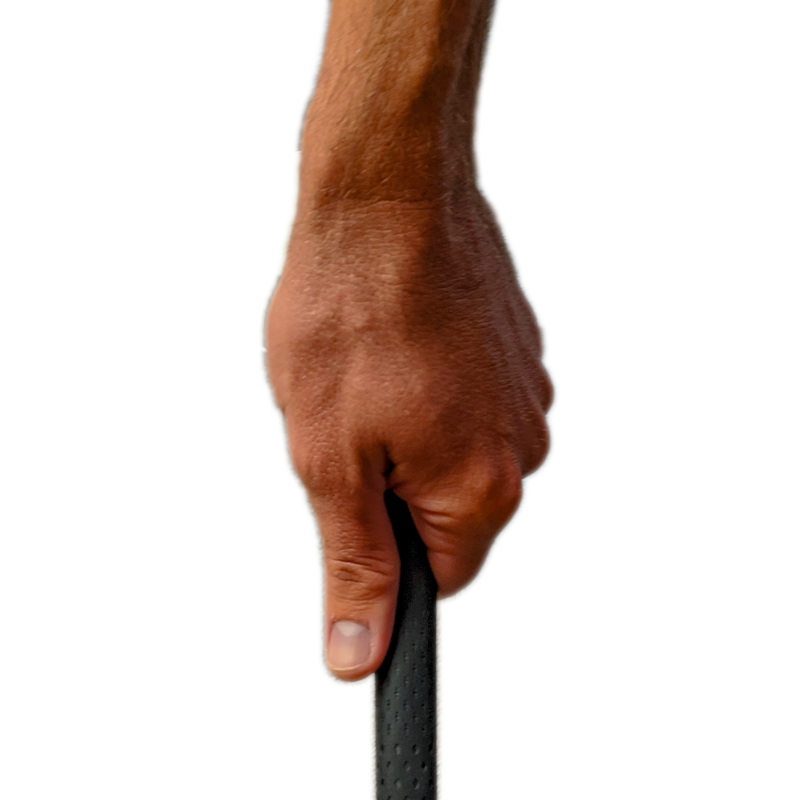
The main difference between your putting grip and a full swing grip is the way the club fits in your hands. When you take a normal grip it sits in your fingers while a putting grip fits in your hand through the lifeline (see the pictures below). When the grip fits in your hand this way, you automatically deactivate your wrists. The other thing you should notice is that the angle of the shaft and your forearms will be the same. This relationship makes it significantly easier to move the putter, arms, and shoulders as one cohesive unit.

Notice the difference in the angle of the full swing grip and the putter grip. The putter grip goes through the lifeline of your hand.
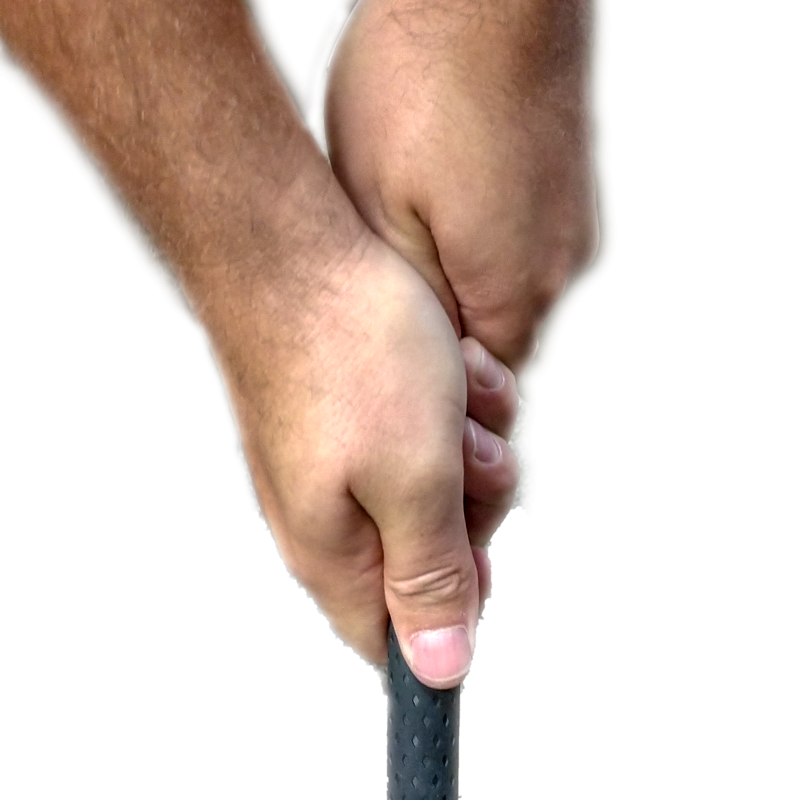
This is an example of a left hand grip where the club is going through the lifeline of the hand. Notice how the angle of the shaft/grip is the same as my forearm.
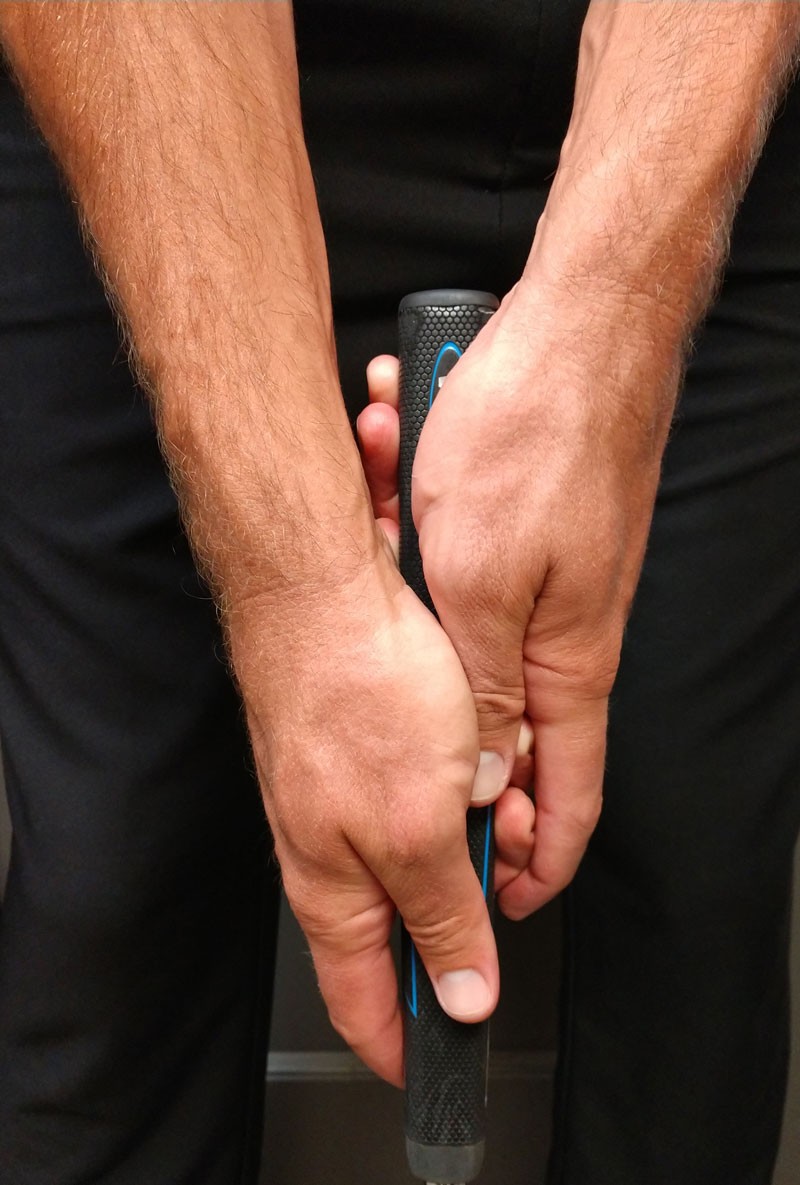
This is an example of what is called a reverse overlap grip. This is one of the most common grips used on tour and also my putting grip.
The reverse overlap grip above is a very functional grip for putting, but not your only option. This grip would be a great starting point if you are trying to find the best grip for you. The most important part of this putting grip is that it puts the grip of the club in the lifeline of both hands and also lines up the shaft/grip with your forearms. There are many different types of grips that great players have used, but the overall goal is finding a grip that allows you to start the ball on your desired line with the appropriate speed.
When you walk up to address the ball, there is a right and wrong way to do this. The correct way is to set the clubhead on the ground behind the ball, aim the putterhead, take your grip, and then get your feet set. This sequence allows you to get setup consistently the same way and gives you the best chance to be relaxed over your putt. The wrong way, and unfortunately something I see more often that I would like, would be the exact opposite sequence. The wrong sequence would be setting your feet first, then taking your grip, and the then aiming and addressing the ball. When you get this sequence wrong the tendency is to lock yourself into an uncomfortable position.
Give this a try and you will be on your way to better golf!
Mike's Golf 101: Lesson 2 - Part 5: Pre-Shot Routine

Part 5 - Pre-Shot Routine
A pre-shot routine is often overlooked by amateur golfers and very rarely overlooked by professional golfers. Over the last four weeks we've went over a large majority of the important factors for a great setup. The key is developing a routine that helps you to get into the correct setup position along with preparing yourself mentally to execute the shot. Keep in mind that everyone won't have an identical routine. Some things that are vitally important to one golfer could be completely ignored by another. The goal simply comes down to preparing yourself mentally and consistently getting setup in a way that works best for you.
In my opinion, the key to playing great golf is knowing where the ball is going to go, before it goes there. The first step of any solid pre-shot routine is to assess your situation and figure out where it is you want your ball to go, and how it is going to get there. To some extent this should go without saying, but I see plenty of golfers get lazy with this first step. When you get up to your ball, you should be looking at factors like yardage, wind, lie condition, any trouble close to your desired target, and anything else that would influence your decision. During this phase of the pre-shot routine, you should be standing behind your ball. It is best to separate the time you are preparing for your shot from the time you are standing over your ball.
With these factors in mind, you are ready to develop a strategy and pick a club to hit. The first thing to understand is that the middle of the fairway and the hole aren't the only two available targets. Think about where you want your ball to go, but don't forget about the obstacles in your way. I would argue that most bogeys, double-bogeys, or worse come at least in part from poor decision making or a poor strategy. When you factor in things like bunkers, out of bounds, water hazards, deep rough and any other undesirable places you start to see the best strategy a little clearer. You want to think about the target that will give you the highest chance of getting close to your optimum goal and the lowest chance of going in an undesirable situation. This usually means that favoring one side of the fairway or the other, or a target a little closer to the middle of the green are often your best options. With a clear strategy in mind, make a practice swing to rehearse the shot you intend to hit.
At this point you are ready to pick out an intermediate target that also matches your strategy. We worked on this in the aim and alignment lesson. As a reminder, an intermediate target is somewhere 2-3 feet in front of your ball that you will use to aim your club and build your setup. You will want to practice this on the range using visual aids such as alignment sticks to make sure that when you get to this phase of the pre-shot routine on the course you consistently get setup correctly.
Developing a strategy, picking a target, and developing a routine that consistently gets you setup properly are all parts of a pre-shot routine that should be universal for all golfers. These parts definitely get you better prepared mentally, but there are techniques to take this a step further. The two main techniques I like to use are breathing and visualization.
Breathing normally while you are preparing for your shot seems obvious but you would be surprised how often I see someone who subconsciously holds their breath for an extended period of time before they hit their shot. To account for this, I deliberately take a deep breath right before I walk up to the ball. When you take a deep breath and exhale, you relieve a lot of tension from your body but it also just reminds you to breathe.
Visualization is probably the most important part of my personal pre-shot routine. I like to think that if you can see it, you can do it. This can be positive or negative so it is important to get a clear picture in your mind. I like to picture the exact ball flight I am looking for while I make my rehearsal practice swing. When you visualize your shot, always visualize exactly what you intend to do. This could be as simple as picturing yourself making a successful swing. It could also be as advanced as seeing the exact ball flight from start to finish of the shot. The key is giving your mind a specific task that is positive.
No matter what your pre-shot routine looks like, the final step is always to make a confident swing. After developing a pre-shot routine that works for you, this final step should happen on every shot.
Give this a try and you will be on your way to better golf!
Mike's Golf 101: Lesson 2 - Part 4: Ball Position

Part 4 - Ball Position
Ball position is an extremely important part of your setup. We are going to walk through the basics of getting the proper ball position relative to your heels, and also the correct distance from the ball.
To start with, we need to understand that not all clubs will be played with the same ball position or with a stance the same distance from the ball. This is mostly due to the fact that all of your clubs are a different length, but it also has to do with the difference in what we are trying to accomplish with each club. As an obvious example, your driver is likely 9-10 inches longer than your sand wedge and a driver is almost exclusively used with a tee. Using the same example, a large majority of golfers would benefit from having less backspin when they hit a driver, and most amateur golfers would benefit from having more backspin with their wedges. Wedges will be played in the middle of your stance when comparing your heels, which encourages a slightly downward motion through impact. This helps with contact but also tends to put more spin on the ball. If you played a driver from the middle of your stance, the ball will tend to come out very low with excess backspin leading to significantly shorter drives even with the exact same swing speed. When a driver is played farther forward in the stance, it gives you the opportunity to have a slight ascending strike into the ball which decreases spin and gets the ball to launch higher. The higher flight and low spin maximizes carry distance but also encourages a longer roll out. This is only possible because a driver is played from a tee. When you factor in the differences in length, and overall goal it leads to the reason why we setup differently for each club.
Below are examples of the appropriate ball position for my Sand Wedge, 7-Iron, and Driver. Notice how I get further away from the ball as I go through each club. Also notice that my feet get wider. The ball position relative to my left foot is the same, but my right foot moves a noticeable amount.

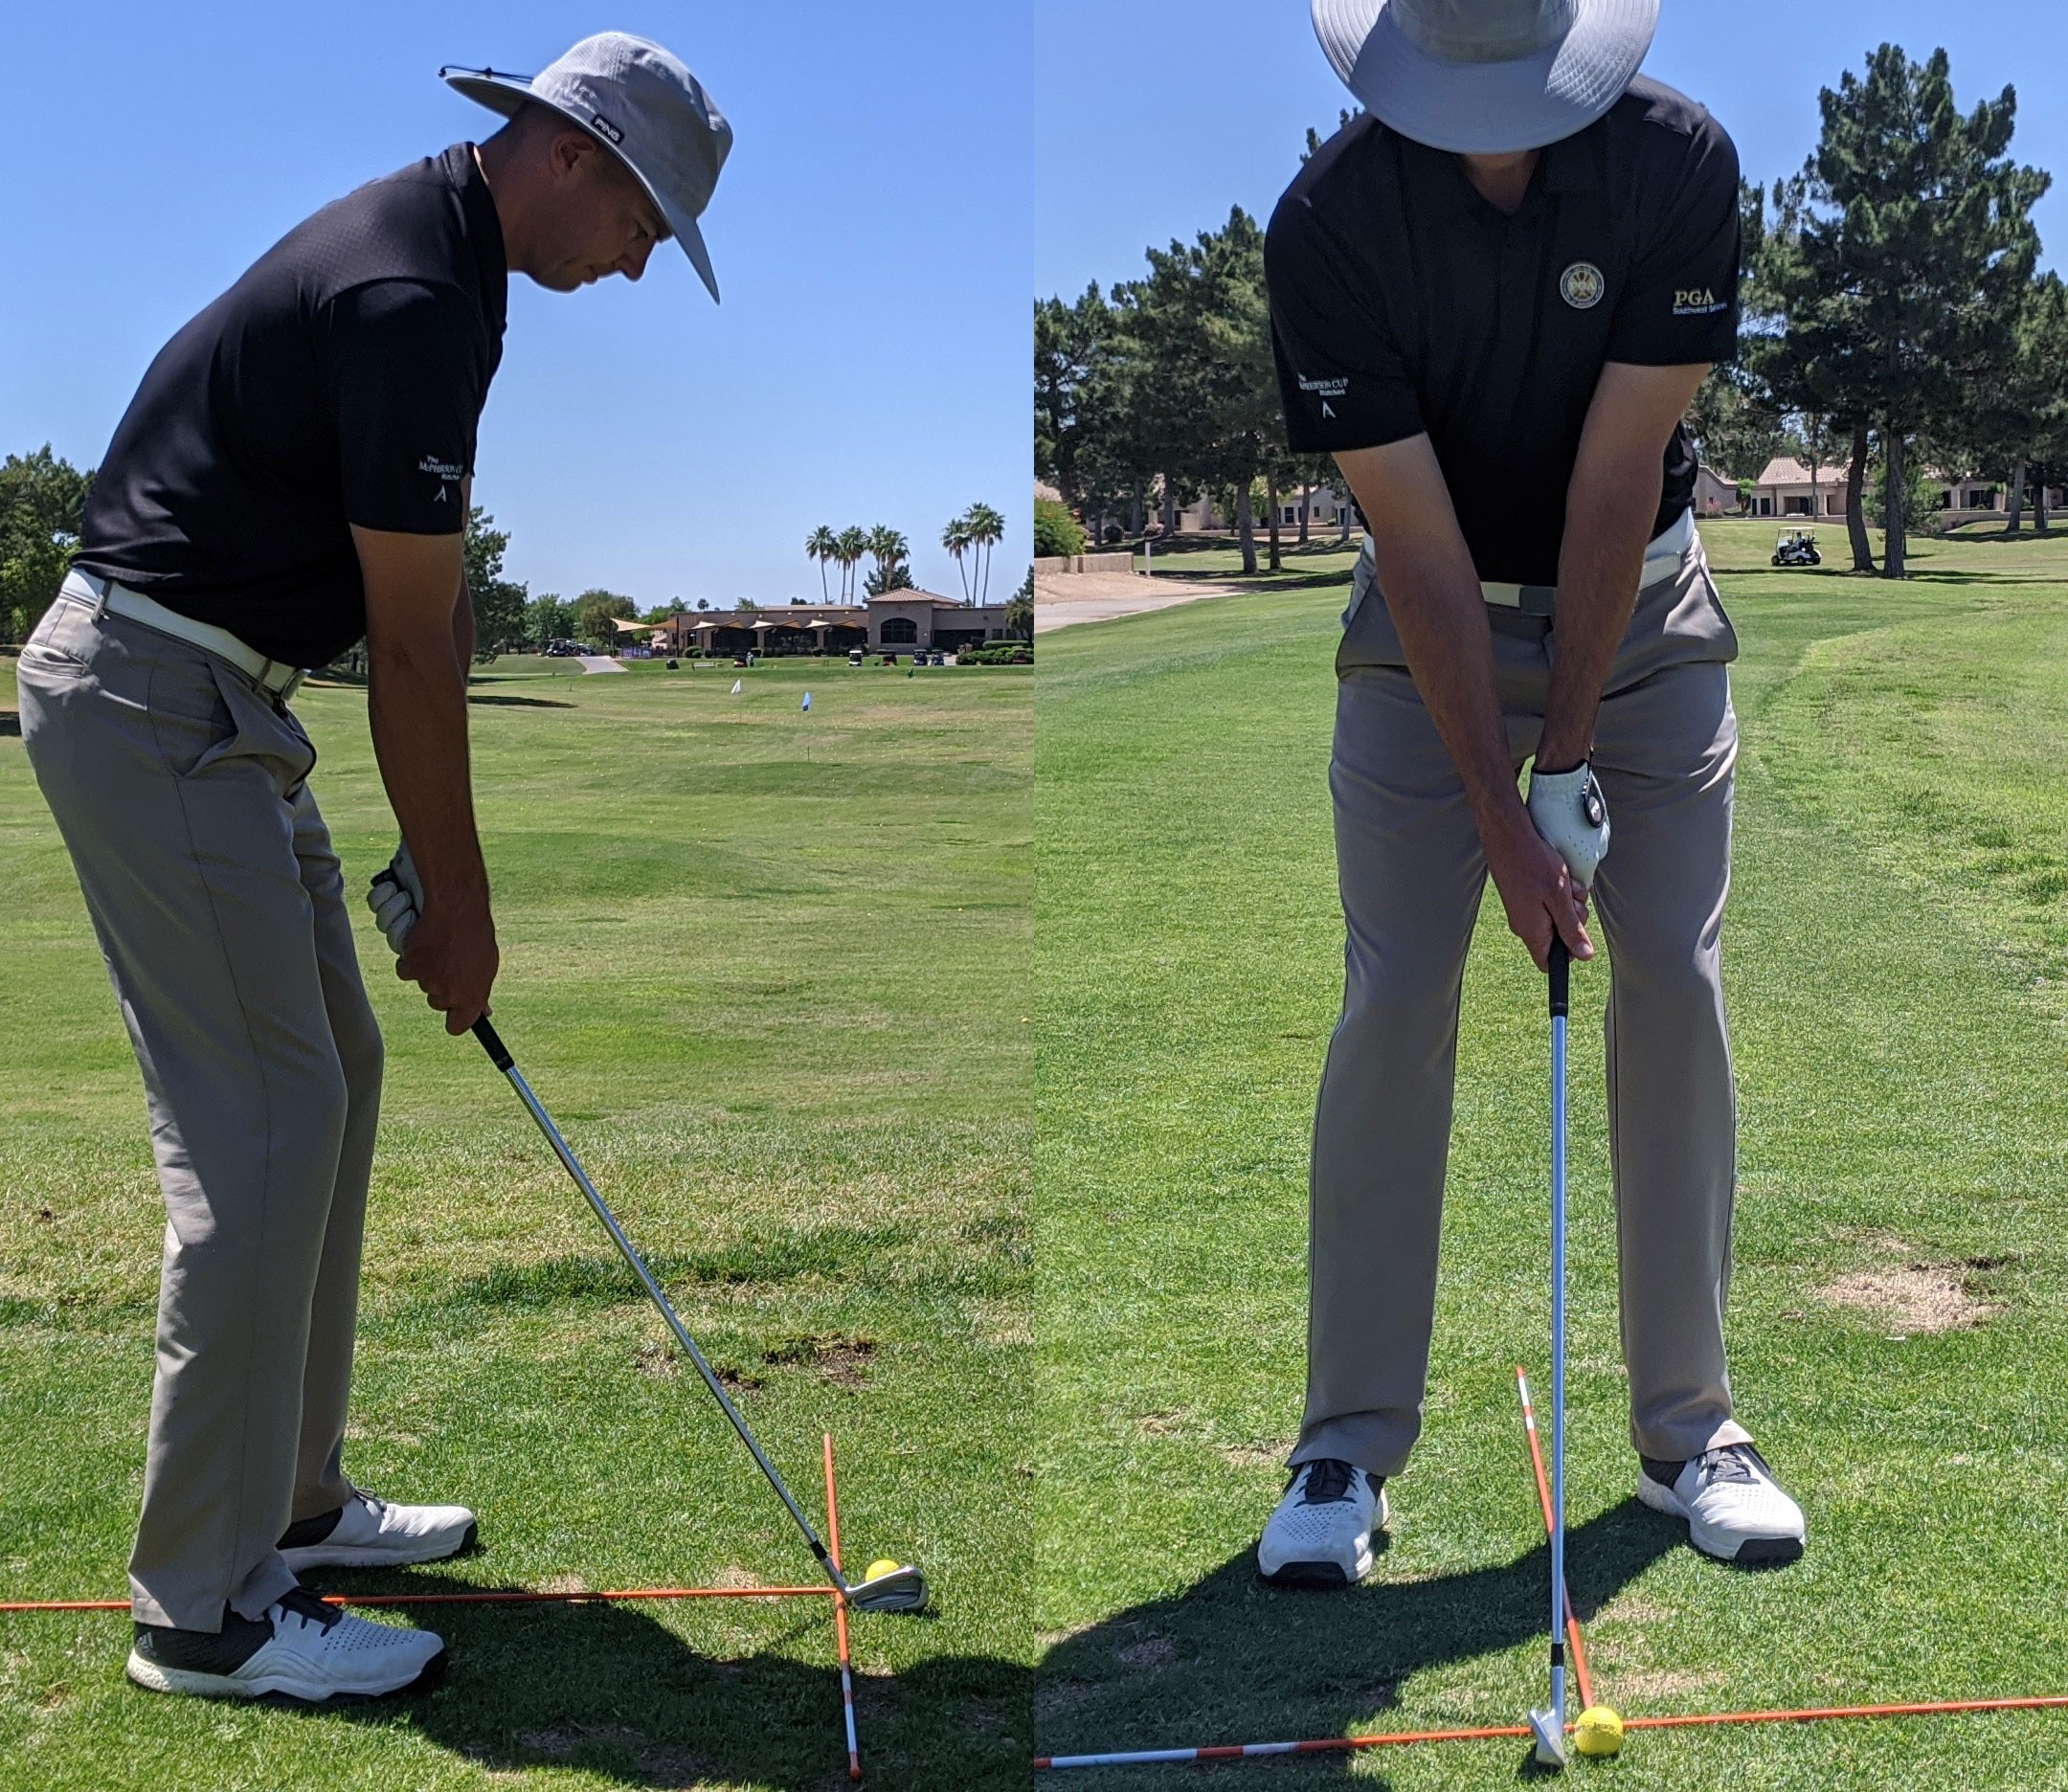
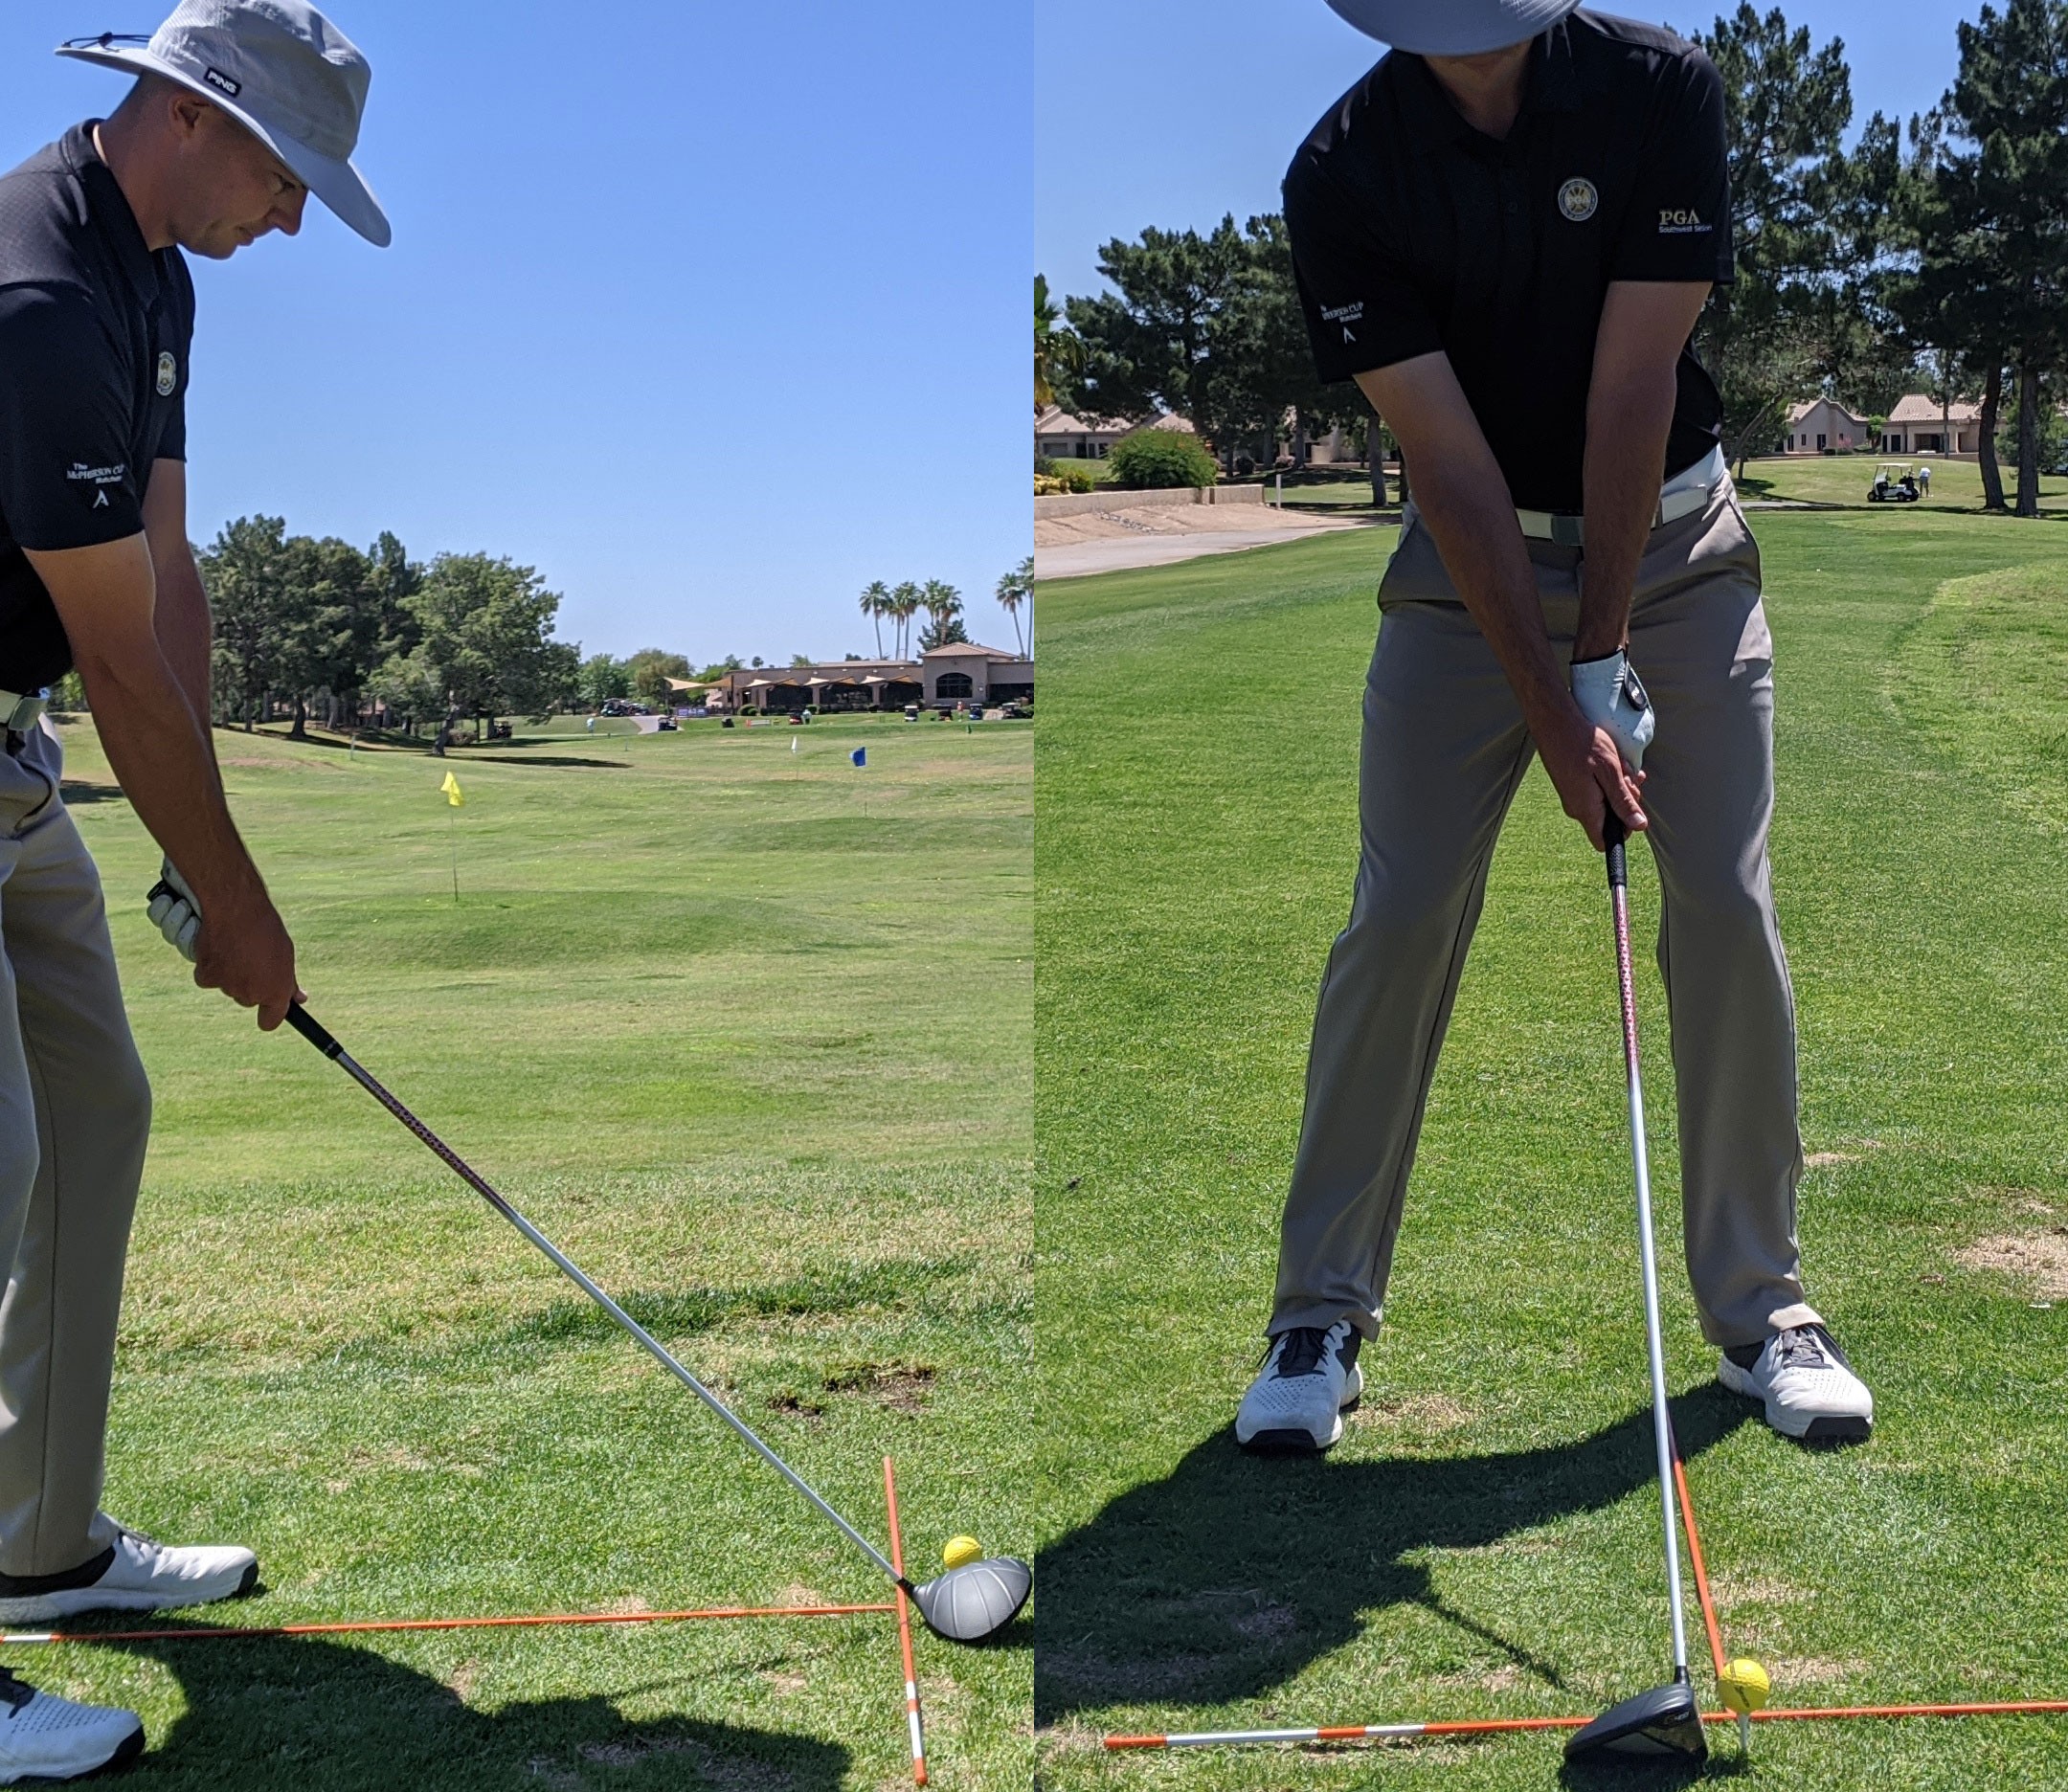
My preferred way to adjust ball position is to always play the ball a couple inches off the inside of the left heel and adjust the right foot for width of stance (for a right handed golfer). This is represented in the pictures above. By using this technique, you accomplish two very important aspects of proper ball position; you get the ball position to effectively change but you also get the appropriate width of stance. If you were to start with your shortest club (likely your SW or LW), you will put the ball about 2 inches inside of your left heel and take a narrow stance. A narrow stance would be a stance where the outside of your heels are about shoulder width apart. When you look down and compare the ball position to your heels, the ball should look like it is in the middle of your stance.
As you work through your set, you will move your right foot to be slightly wider until you get to the driver where the inside of your heels will be slightly wider than your shoulders. Using this technique, the ball will appear to be much closer to your left heel compared to the right when you setup to your driver. As a rule of thumb, the ball should never be right of center for any club for a standard setup. If your goal is to hit the ball very low for the wind or to hit under a tree it can move slightly back compared to normal, but not for a standard setup.
Along with ball position relative to our heels, we also move slightly further away from the ball as the club gets longer. The easiest way to get the appropriate distance from the ball is to first put the club on the ground so that the sole of the club is flat on the ground. If you aren't comfortable with the club flat on the ground, the heel can be slightly lower than the toe. You never want the toe lower than the heel for any shot played with a full swing. This gives you a great reference point for where the grip of the club should be.
From this point, let your arms hang directly under your shoulders and move up to the ball where your arms naturally hang and meet the grip. With woods and hybrids, the heel will be somewhat lower than the toe. The reason the heel can be a little lower than the toe is due to the club bending slightly when you swing. If you were to start with your shortest club and go through this process with each of your clubs, you would notice that you will get further away as you work through your set. There isn't one set distance away from the ball for every golfer, everyone's distance away will be similar but not the same. This is because everyone is a different size and shape. By building your stance around the idea that the sole of the club should be flat on the ground combined with a natural arm hang, you will consistently get the correct distance away from the ball.
Give this a try and you will be on your way to better golf!
Mike's Golf 101: Lesson 2 - Part 3: Aim & Alignment

Part 3 - Aim & Alignment
Aim and alignment go together but aren't exactly the same thing. The way I like to think of it, aim refers to the direction the clubhead is pointing, and alignment is referring to the way your body is setup in relation to the clubhead.
The first thing to understand about alignment is that your clubhead should be aiming at your target, and your body is going to be setup parallel to your target line. Picture that you are standing on railroad tracks. Next, picture that your ball and clubhead are on the outside track and your feet are on the inside track. If you followed the tracks all the way to your intended target your would see that your feet are very slightly left of the target for a right handed golfer. That is the correct alignment.
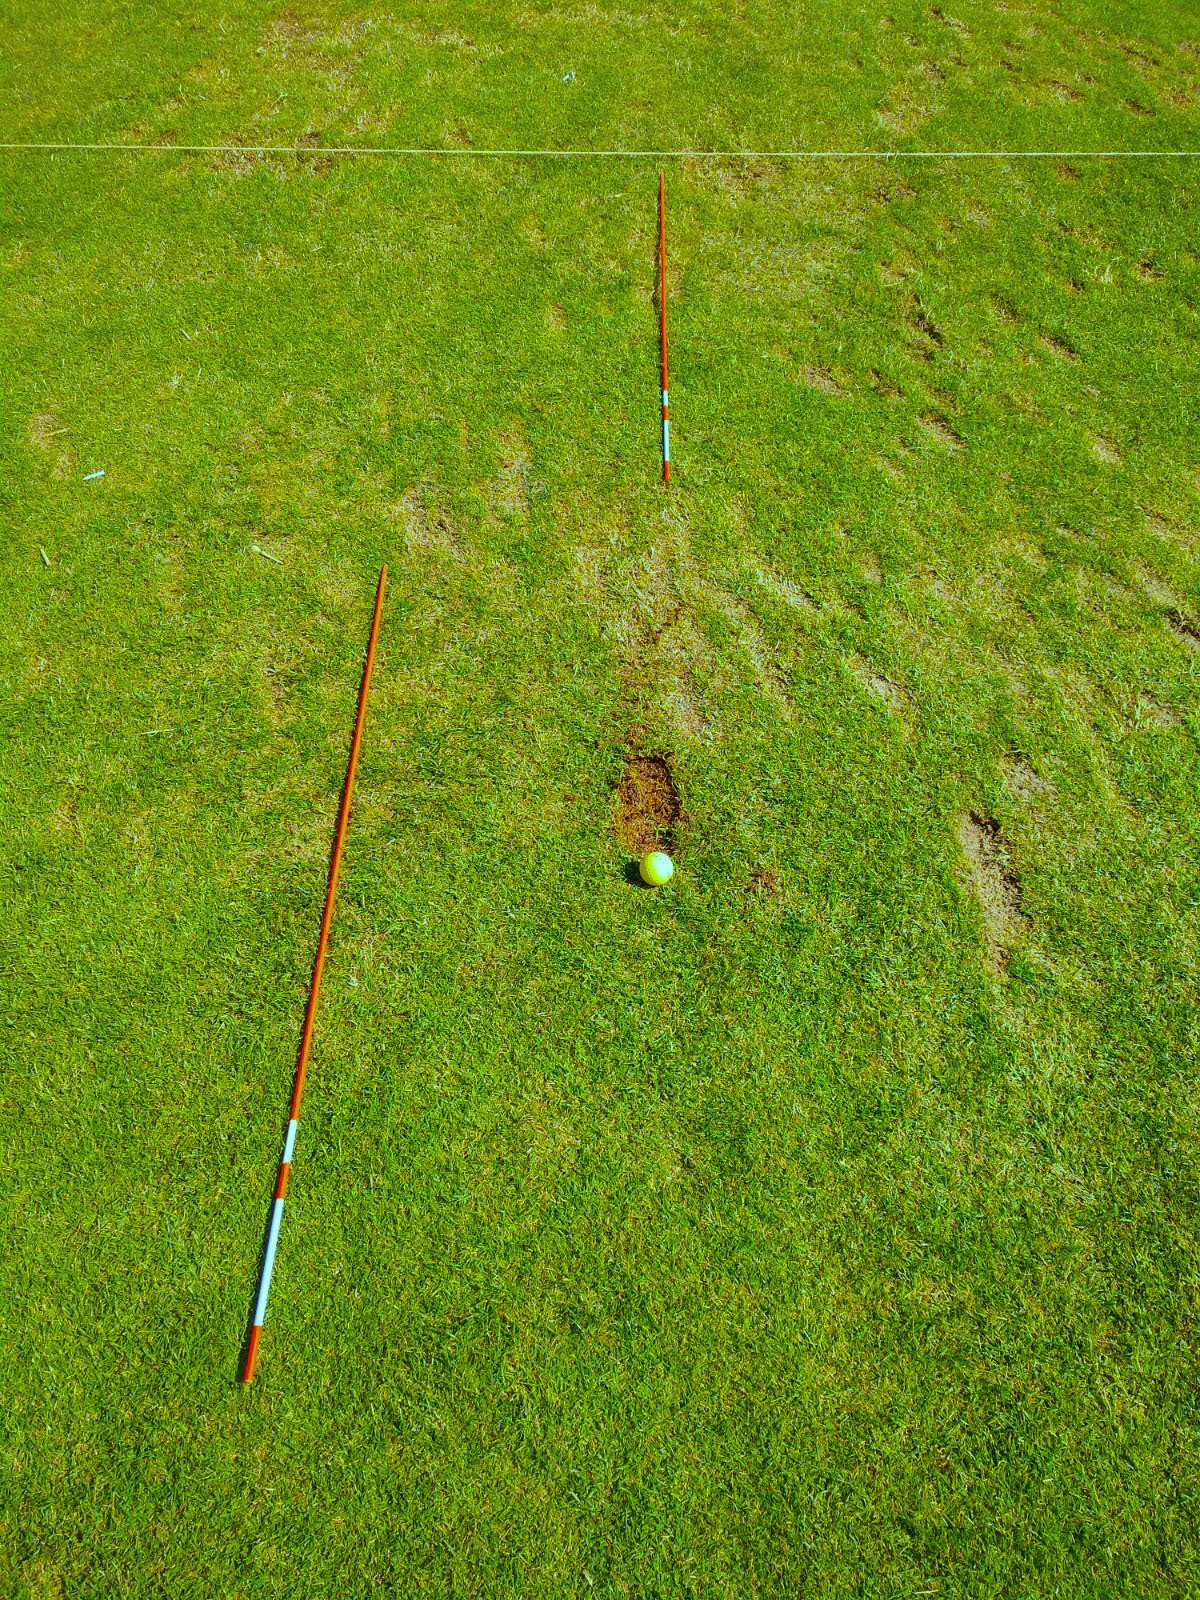
Getting your feet parallel is a very important component of proper alignment, but it isn't the only thing you are trying to get lined up. You are also trying to get your knees, hips, forearms and shoulders parallel to your target line. While you are practicing this, setup a station like the picture below to give you a better reference. You'll have an alignment stick or golf club for your feet, and another alignment stick about 2-3 feet in front of the ball indicating your target line. Use this setup as a reference while you are getting comfortable with getting your feet, knees, hips, forearms, and shoulders parallel to your target line.
Below is an example of how to setup for your practice session. The alignment stick on the left will be for your feet and used to make sure that your knees, hips, shoulders, and forearms are parallel. The other alignment stick will be on your target line along with the ball. After you hit your first shot, place the next ball directly behind the divot and continue doing that until you have a long divot about 2 feet long. Either repeat the process right next to the first line or switch clubs and re-adjust the alignment sticks.
Now that you have the basics of alignment, it is time to dive a little deeper into aiming correctly. In theory, aiming your club at your intended target is a pretty simple principle. In reality, it is actually pretty difficult to do without spending a lot of time on the range with alignment sticks or developing a technique to help you.
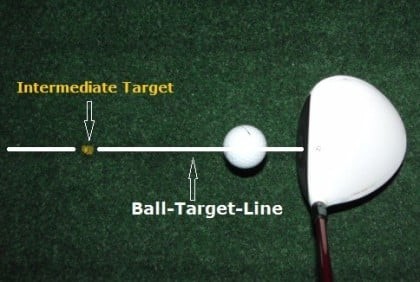
The reason aiming in golf is so difficult is due to the fact that our eyes are not on our target line. Our eyes will be inside of the target line and this distorts our ability to aim correctly. In order to account for this, most good players use an intermediate target to help them aim better. An intermediate target will be a piece of grass, a divot, a pebble or anything in the first 2-3 feet of your target line that you can use to aim your club. Start by standing directly behind your ball so that you can picture a line between your ball and intended target. Picking an intermediate target from anywhere but directly behind your ball completely defeats the purpose of this technique. Once you have your intermediate target 2-3 feet in front of your ball, walk up to address the ball. Aim your clubhead at the intermediate target first and then build the rest of your setup. By picking an intermediate target you make it significantly easier to aim your club correctly. Once the club is aimed correctly, it is easier to get your feet, knees, hips, forearms and shoulders parallel to your target which gives you the best chance to hit your ball at your target.
Give this a try and you will be on your way to better golf!
Mike's Golf 101: Lesson 2 - Part 2: Posture & Balance

Part 2 - Posture and Balance
The best place to start when building your setup is to first understand what it is that you are trying to accomplish. The basic idea is that you are trying to get low enough in order to comfortably reach the ball, create natural space for your arms to swing, and to have balance. If you get any of those wrong, you are setting yourself up in a way that makes swinging a golf club very difficult.
As I have already alluded to, you will have a very difficult time grounding your club behind the ball if you are standing straight up and down. The first and most important step in building your setup is to bend from your hips. To get into the correct position, start by standing straight up and down and fully relax your arms. While standing straight up and down, you should notice that your arms naturally hang to your sides. Now, if you bend from your hips and continue to relax your arms you should notice that your arms are now hanging in front of you with enough space to swing. You do not lift your arms away from your body to create this space, your arms will hang directly under your shoulders. This accomplishes two extremely important components of a good setup; you get yourself lower to the ground and you have created natural space for your arms to swing.
The next step is a slight knee bend. The knee bend is to serve the purpose of getting slightly lower to the ground but also to get your legs engaged. You do not want to get down to the ball entirely with your knees. When you are trying to get into the right position, start with the hip bend, then get the slight knee bend.
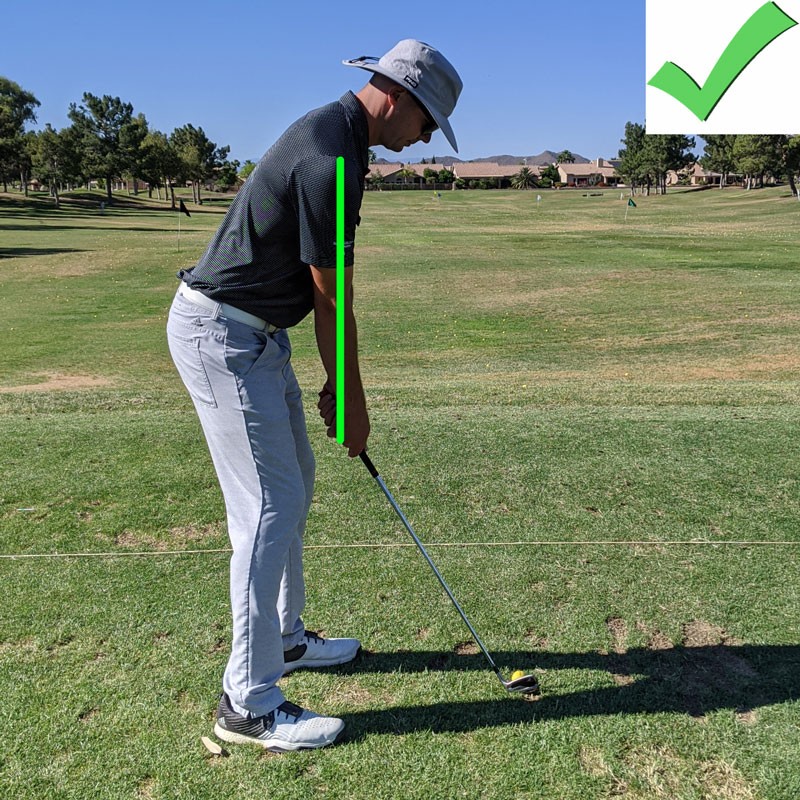
Below is an example of a good setup. Notice that the arms and hands are hanging directly under the shoulders. The back has its natural curve which is very minimal and almost straight. Also notice a very slight knee bend.
If you have followed the steps so far, you are really close to the correct setup, but there are still two more very important steps. When you take your grip, your right hand (for RH golfer) has to go on the grip lower than the left hand. As a result, you have to get your body in a position to naturally allow for this. In the video I explain a great way to do this but you need to tilt your shoulders where your right shoulder goes lower than your left (for right handed golfer). Keep in mind, you are changing the relationship of your shoulders by tilting your spine, not by individually lifting your left shoulder.
The final checkpoint is to check your balance. The easiest way to explain what I mean by balance would be to again start by standing straight up and down on a flat surface. Pay attention to what your feet feel on the ground. What you should notice is that your weight is distributed evenly between your left and right foot. You should also notice that you don't feel any extra pressure in your heels or toes and the weight should be evenly distributed. Once you have that feeling, build your setup following the steps above, and just make sure that you feel balance in your feet the same way you do when you are standing upright.
Below is an example the most common poor setup that I see. Almost all of the bend down to the ball has been created with the knees and the spine angle is almost vertical. This almost always goes together with the arms being lifted away from the body to create space. This makes it very difficult to use the shoulders properly. It is also very unstable because of the excessive knee bend.

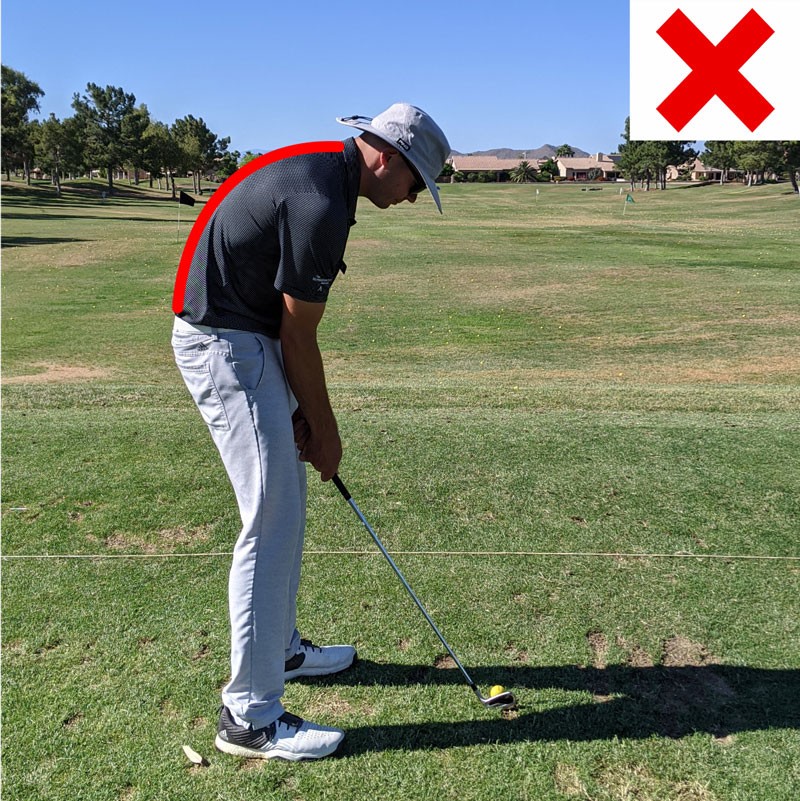
This is an example of what is called a c-curve posture. If you can imagine where the belt buckle would be pointing here it would almost be parallel to the ground or in other words, there is practically no bend from the hips. Almost all of the adjustment down to the ball is coming from the back. This doesn't allow any shoulder rotation or a natural hip rotation.
This next example would be too much bend from the hips and standing too close to the ball. This is less common but notice how the arms aren't hanging directly under the shoulders. This can lead to a wide array of issues but most notably it makes it extremely difficult to properly start the backswing since the right leg is in the way.

Give this a try and you will be on your way to better golf!
Mike's Golf 101: Lesson 2 Part 1 - Proper Grip

Part 1 - Proper Grip
There are many things that lead to better consistency, but nothing more important than your setup. In other words, everything you do prior to setting the club in motion plays a major role in your ability to make the swing you're capable of making. Over the next few weeks I will be covering 4 major components of a proper setup. This week we will take a look at the proper grip.
There are many factors in your setup that will contribute to your ability to make your desired swing but an improper grip leads to some of the most interesting compensations that I see. “Interesting compensations” is basically the polite way to say “swing flaw” and a poor grip leads to a wide range of compensations.
For this example we will assume you are a right handed golfer.
The most common grip fault I see is getting the grip going through the lifeline of the left hand rather than getting the heal pad on top of the grip. That might be difficult to visualize so please refer to the pictures below. This type of grip works great for putting but automatically takes away a significant amount of potential distance in a full swing. It removes distance because it doesn’t allow your wrist to move naturally and limits the strength in your hands. This loss of strength generally leads golfers to grip too tight and/or lose control of the club. To obtain appropriate grip pressure and control you must have the heel pad of your left hand.
This is a poor grip that goes through the lifeline or middle of the left hand. Notice how the grip and forearm are on the same line and the grip is going between the thumb pad and heel pad of the hand.

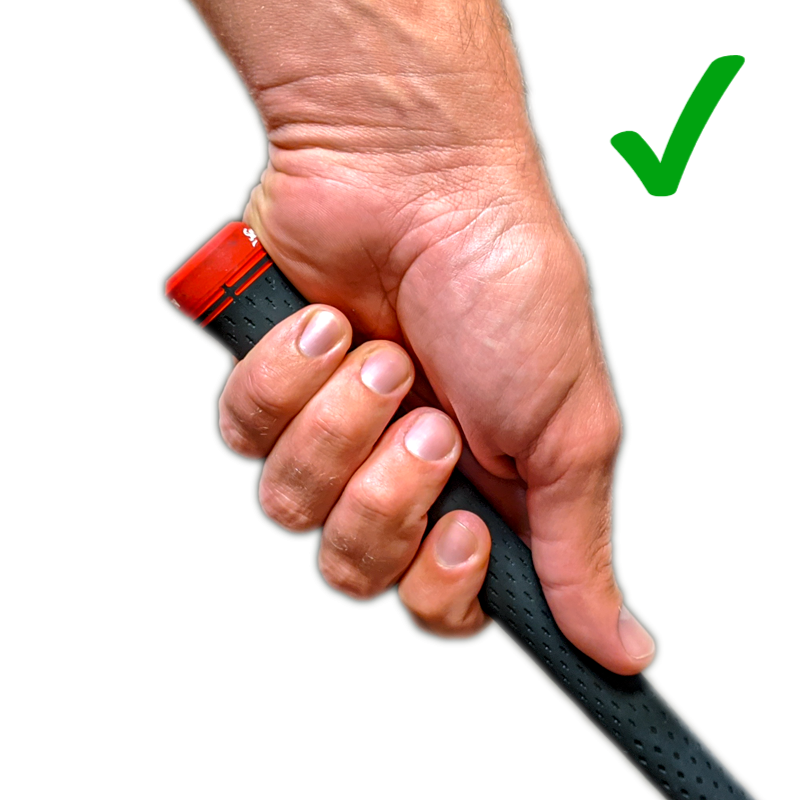
This is a good grip, where the heel pad of the left hand is on top of the grip. Notice how the grip is not in a perfect line with the forearm.
Now that you understand how the club fits in your left hand, there are still a couple more important considerations to make with your grip. These next checkpoints will help you understand the factors that lead to an open or closed clubface and how the right hand fits on with the left hand.
If you take a look at the grip below, it is the face on version of the good grip above. Notice how close the thumb is to base of the index finger. When you look down at your hand, the thumb is roughly at a 1:00 position if you are a right handed golfer. This position can change slightly from golfer to golfer but it is important to understand the effect this has on the clubface. For a right handed golfer, the further you rotate this clockwise, the easier it is to close the clubface. If you rotate counter clockwise the easier it is to open the clubface. Keep in mind that regardless of how your hand is rotated on the grip, the heel pad of your lead hand will always on top of the grip.
The grip with your left hand is just the natural position that your arm hangs from your shoulder. If you bend from waist and let your arms hang from your shoulders, you should notice that they both hang in a way where your palms face somewhat toward your body. If you put the grip in your left hand from this position, keeping in mind that the heel pad should be on top of the grip you should have a grip that looks very similar to the example above.
The right hand fits on in a different way. If you have the left hand on correctly, the right hand should fit together like a puzzle piece with the lead hand. The lifeline of your right hand should fit nicely over the thumb of your left hand. The right hand should feel like it is more in your fingers compared to the left hand. When you have both hands on the club, the final checkpoint is to make sure that the V's in between your thumb and the base of the index finger are pointing in the same direction. Take a look at the picture below and notice how the lines between the thumb and the base of the index fingers are parallel to each other. A good place to start is with both V's pointed at your right shoulder if you are a right handed golfer.
Give this a try and you will be on your way to better golf!
Mikes Golf 101 - Chapter 1 - Stop trying to keep your head down!

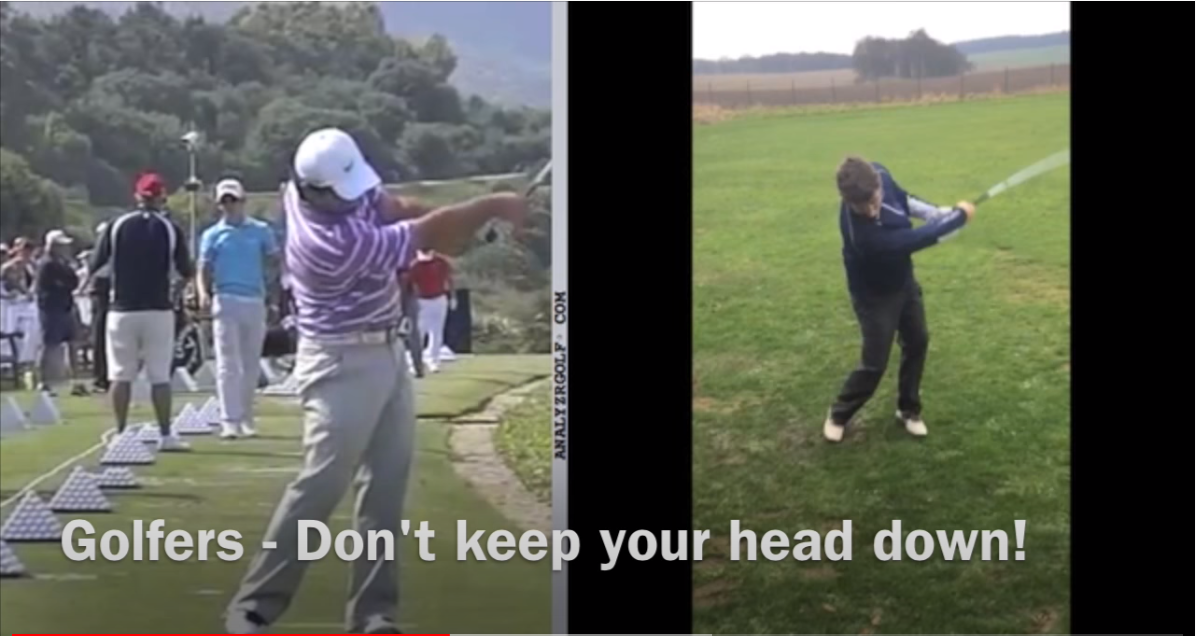
My advice to all golfers is to erase the idea of "keeping your head down" from your memory forever. If you topped the ball or made some other undesirable shot, the least likely reason for a shot like that is early head movement. More often than not, it is actually related to your setup position. Check that your arms are hanging naturally from your shoulders where they are fairly straight but still relaxed. By bending from your waist with a slight knee bend, you should have enough space in front of you for your arms to swing naturally. When your lead arm makes impact with the ball it should be extended so if you start your setup with bent arms and a poor setup you will always have to make compensations that lead to inconsistencies such as the dreaded topped shot. The “lifted head” or loss of posture just happens to be one of these inconsistent compensations, not the underlying issue which is likely related back to your setup position.
Just for fun, I compiled some pictures of great golfers whose heads were rotated well past the ball at the point of impact. There are certainly more golfers who would have been looking at the ball at the point of impact but not a single one whose head would be looking at the ground at the finish of their swing. You may recognize most of them since 3 out of the 5 were ranked #1 in the world for extended periods of time.
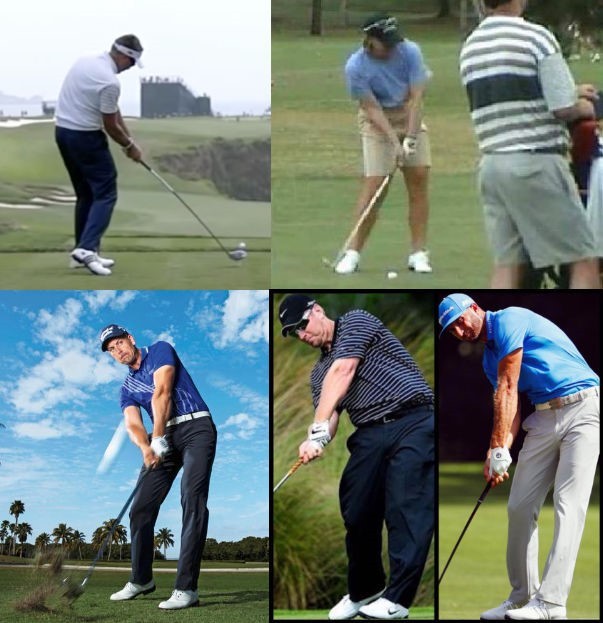
Robert Allenby – 4 PGA Tour Wins – 4 European Tour Wins
Annika Sorenstam – Former World #1 – 10 Major Wins – 72 LPGA Tour Wins
Henrik Stenson – 6 PGA Tour Wins – 11 European Tour Wins
David Duval – Former World #1 – 13 PGA Tour Wins
Dustin Johnson – Former World #1 – 20 PGA Tour Wins – 7 European Tour